Although this is a great area to live, one of the things I still miss about living in London is a wide range of top-class take-away food restaurants on the doorstep. The whole process of ordering it online, dropping in and having a chat whilst waiting to collect it, carrying it tenderly home whilst inhaling the stunning aromas, and then pouring a big glass of wine to kick back and munch and slurp accompanied by a good movie was wonderful. My takeaways were always something to seriously, seriously enjoy.
Enter Pull Up Pizza in Farndon (Harbledown House Garage, Churton Road, Farndon), a splendid fortnightly pop-up, every other Friday, that has brought a large dash of cosmopolitan sparkle to the village, and produces pizzas to order on the premises that quite simply make your heart sing. Mucho mucho happiness. The upmarket take-away has arrived, and in style. The magicians are husband and wife team Will and Charlie, with Jonny and Chris, who form the power-team that produce this excellence, working like crazy, making time for quick chats with big smiles.
I first noticed it on Friday two weeks ago when I passed the garage entrance on my way home, a little way up from the post office/pharmacy in Farndon as you head north on Churton Road towards Chester. To my surprise the garage entrance was wide open, filled with light, and there was a busy pizza-making operation in full swing. I immediately abandoned my plans for making a fiddly cheese soufflé, ditched the car, and entered a nirvana of bright music, a chatty, friendly atmosphere and the most gorgeous aromas emanating in my direction. Fifteen minutes later I walked out with an exciting pink and black pizza box, the proud possessor of a Penduja Power. Oh the bliss! I could barely wait to get home to lift the lid as the aromas began to do serious injury to my will-power. The Penduja, with a crispy crust, thin base, chunky slices of jalapeño and thickly spread nduja, has a serious kick to it, with smokiness from the pepperoni, whilst both the creamy fior di latte mozzarella and pure mozzarella ensure that there is just the right balance of flavour, with subtle undertones and divine ultra-spicy overtones, all accompanied by gorgeous hits of fresh basil. It really was love at first glorious bite ❤️.
Pull Up Pizza’s “Penduja Power” with a guilty slice missing
I was so busy enjoying my small chunk of heaven that I forgot to photograph the thing. This meant (oh dear, oh dear) that I had to go back this Friday to buy another one. And you know what? I had already been so completely overpowered by the alluring scents by the time I arrived home that I had devoured a slice before I remembered that I was supposed to be taking a photograph of it – again! This could have gone on forever, so here’s the photograph of the pizza decanted onto a very large pre-heated plate with (ahem) one slice missing. Please note that before I had wrestled it with inelegant haste from its box it was actually a thing of real beauty and perfection.
Although they can take walk-in orders when they are not snowed under with online orders, the whole operation is based on the premise that pre-orders will enable them to respond with maximum efficiency to make their pizzas to order, ready for collection at a certain time. They emphasize that checking ordering before cut-off times is essential, so signing up to their newsletter (a maximum of three emails a month) or checking their website or Instagram page is essential. For example today’s cut-off for all evening orders was 3pm, and order collections began at 4pm and ended at 9pm. For full details of how it works see the Pull Up Pizza website, but basically you can either order via Instagram or if you don’t have an account, you can just click the Order Pizza Now button on the aforementioned website, which is what I did. Customers select a fifteen minute timeslot from a drop-down menu and pay in advance, and it all seems to work like an absolute dream. There are a number of different payment options, including debit card, credit card and Apple Pay, and of course you receive an order confirmation.
This is a real pop-up. When they close down, everything is on wheels so simply pushes back out of the way to re-create the garage space. It was really good to see people coming and going, chatting to the proprietors and generally enjoying the spectacle and the anticipation of great pizza and garlic bread (oh the scent of that garlic bread!). If you arrive early there is a bench inside where you can sit and wait. There is parking on the road immediately outside as well as on the main Farndon high street, and of course there is free parking at the Memorial Hall on Church Lane.
I am a serious pizza nut, so it is a matter of some celebration that these guys have established Pull Up Pizza so close by. My major challenge is to wean myself off the Penduja Power and try one of their other pizzas, all of which are listed on their website. I foresee a Crimson Blaze on the horizon. The fact that they are only open once a fortnight holds out some hope for my waistline actually continuing to be a waistline. Wishing them all the best for a really great future – it’s such an enterprising idea, and so well executed. xxx
Plas Newydd today, with the porches and gothic-style windows added by Lady Eleanor Butler and Miss Sarah Ponsonby, and the ornamental battens to emulate half -timbering that were added by General John Yorke after 1876.
Plas Newydd was on my long list of things to do in the area, one of those places that every Llangollen visitor aims to tick off. In spite of the outward mock-Tudor chocolate-box appearance, it is a real gem, a completely fascinating treasure trove of late Gothic and Early Modern wood carving used like wallpaper, together with0 patchworks of fragmented stained glass, plasterwork ceilings, delftware tiles, gilt leather wall hangings and Lincrusta wallpaper. The story of how this blend of decorative arts came about, based on the enthusiasm of two eccentric Irish ladies who moved here in 1780, is probably better known the house itself. The eccentricity of both ladies and house is unarguable, but there is an energy and antiquarian-style authenticity about the place that is equally undeniable and is truly compelling. The house turned out to be an absolute delight.
Plas Newydd as it was at least in the time of General Yorke, just showing his new wing at far left, with the mock-Tudor half- timbering on the original cottage, but retaining the canopied oriel windows and porch installed by the ladies. Pre-dates the wing added by the Robertson brothers to the right. Source: People’s Collection Wales
Plas Newydd is not merely the story of the two ladies, Lady Eleanor Butler and Miss Sarah Ponsonby, who began its transformation from traditional cottage to glorious extravaganza of lovingly-collected decorative arts, but also captures the work of its subsequent owners who, while following in the footsteps of Lady Eleanor and Miss Ponsonby, continued to build on the imaginative legacy, adding ever-more creative features and curiosities. The character of the building is unique. Although it is an absolute riot of history, textures and ideas, somehow it works both as an aesthetic experiment and as a patchwork collection of earlier materials and styles.
View of Plas Newydd showing the addition of a new wing under the ownership of Mr George Henry Robertson and his brother, who purchased Plas Newydd in 1890. It lacks the hipped roof of the older cottage. The extension built by the previous owner, General Yorke, can just be made out at far left at an angle to the main house (see the photograph below for General Yorke’s wing). Source: The National Archives, ref. INF 9/641/7
The house is a palimpsest, meaning that when you visit, you are confronted with layer upon layer of addition and alteration, but there is no immediate sense of who added what or when. Even for experts it has been difficult, and in some cases impossible, to establish a timeline for when the alterations to the interior of the building were made, when new features were added and by whom. As none of the parties recorded their purchases and installations, distinguishing between wood carving additions made by the ladies and by General Yorke has been particularly difficult, because their respective collections derive from the same time period in the late 16th and 17th centuries. It has been less of a challenge to establish a precise chronology for the exterior woodwork, partly because sketches, watercolours and photographs have helped to divide the work of the ladies from those of General Yorke and the Robertson brothers.
A gift from the Vicar of Ruthin
As an example of the palimpsest effect, the visitor’s first view of the exterior is dominated by the regimented decorative battens that imitate half-timbering with the striking urn motifs shown on the photograph above. This actually belongs to the post-1876 activities of General Yorke, who purchased the property four decades after the death of Lady Eleanor and Miss Ponsonby, who were responsible for the elaborately decorated oak porches and the medieval style lancet windows. From around 1814 the ladies also decided to panel the interior of their modest Welsh cottage with imported pieces of Elizabethan and Jacobean wood carving, and to fit fragments of earlier stained glass in some of their newly fitted lancet windows. But it was General Yorke who created the Oak Room, which had been the kitchen in the days of the ladies. In spite of the difficulties concerning the chronology of the installations, it is unarguable that the ladies were certainly responsible for the overall concept.
Now maintained by Denbighshire County Council, the property is beautifully cared for inside and out. The place has an incredibly intimate feeling that was would not have been recognized by any of the ecclesiastical and manorial contexts from which the carvings, leather hangings and stained glass were extracted.
Part 2 of this piece looks specifically at the stained glass, which was surveyed by Mostyn Lewis in 1970. Part 3 provides short summaries of the “delftware” tiles, the leather wall hangings, the Lincrusta wallpaper and the plasterwork ceilings.
Plas Newydd with Castell Dinas bran on the hill behind it
The library at Plas Newydd
====
“The Ladies”
Ireland
Kilkenny Castle in 1832. Source: Wikipedia
Lady Eleanor Butler (1739–1829) and Miss Sarah Ponsonby (1755–1831) met at Kilkenny in Ireland, where Eleanor lived in the family home, Kilkenny Castle, and where Sarah was at the private school run by Miss Parkes, 12 miles away from her home in Inistioge. Both of them were related to aristocratic families. 13-year old Sarah’s guardian Lady Elizabeth (Betty) Fownes, a cousin of her father, had asked Eleanor’s mother to keep an eye on her orphaned ward, and this task had been seconded to 29-year old Eleanor, the youngest of the Butler daughters and the only one who remained unmarried. When they first met there was a 16 year difference in their ages, but they became very close, with Sarah’s more retiring and diplomatic character apparently complementing Eleanor’s more forceful and sardonic personality. After Sarah’s departure from school at the age of 18 in 1773, she moved back to her guardians’ home Woodstock at Inistioge. Sarah and Eleanor exchanged letters, building on their profound rapport, sharing their stories of mutual unhappiness in their respective homes, and offering each other support.
As an unmarried and recalcitrant spinster Eleanor was largely disregarded by her family, whilst the gentle Sarah, loved by Lady Betty, was receiving unwanted attention from Lady Betty’s husband Sir William who, according to his granddaughter, thought that Sarah might make a suitable replacement for Lady Betty, should her uncertain health leave him widowed. Via their correspondence, the friendship deepened, and eventually they decided that leaving Ireland and setting up home together would provide them with the happiness that was otherwise lacking in their lives. They first attempted to run away from their respective homes to leave Ireland in March 1778. They were tracked down by Eleanor’s family, crushing their plans to board the ferry to Wales, and were returned to their respective homes. Lady Eleanor’s mother attempted to convince her to enter a convent in France, where Eleanor had been educated, whilst Sarah was seriously discouraged from pursuing what Lady Betty thought would be a disastrous course of action for her orphaned ward. When Eleanor again ran away and was found to be hiding in Sarah’s bedroom at her home, Woodstock, assisted by the redoubtable Woodstock maid Mary Carryl (alternatively spelled Carryll or Carol) who was smuggling food to Eleanor, both families were apparently convinced that the Eleanor and Sarah could not be dissuaded, and the two were grudgingly permitted by their families to depart for Wales to make new lives for themselves, accompanied by Mary Carryl. They left Ireland by ferry in May 1778.
Beginnings in Wales
A very rough sketch of how the modest cottage looked before it was rented by the two ladies, adapted from a contemporary watercolour, in which the frontage is partially concealed by vegetation, included to show how simple the cottage was before modifications began
The ladies arrived in Milford Haven on 9th May 1778, and immediately set off on an adventurous tour of north Wales and the borders, first heading north to Machynlleth and on to Bangor They visited Llangollen in their travels, but moved on afterwards. As well as enjoying the opportunities for tourism, they were looking for somewhere suitable to settle down, and were becoming increasingly desperate to locate a suitable home as their funds began to diminish. They returned to Llangollen later in 1778, staying first at Blaen Bach Farm for the winter, before moving in 1779 to a town property owned by the Llangollen postman. In 1780 they were at last able to rent the cottage then known as Pen-y-Maes (meaning top of the field) from landlord John Edwards of Pengwern.
The ladies’ new home started its life as a traditional low-ceilinged 3-bay, 2-floor stone-built cottage with a central doorway, five rooms and attic space. It is sited in a lovely location set above the river valley alongside the shallow and gently bubbling Cufflymen, which still filters water from the hillside into the Dee. In the grounds were outbuildings including a single-storey stable building to the southwest of the house, which remains today, its construction marked by the inscribed date 1778, predating the arrival of the ladies by two years. Beyond it, the picturesque ruins of the medieval castle Dinas Bran are visible from what was the field in front of the house where sheep were grazed and which now houses a formal yew garden and an early 20th century Gorsedd stone circle. The lovely ruins of the medieval Valle Crucis Abbey were nearby. Both the castle and the abbey were features that resonated with the romantic historical idealism of Georgian and early Victorian society, and which very much appealed to the ladies.
Plas Newydd sometime between 1835 and 1850 by W. Crane showing Dinas Bran on top of the hill in the background. Source: People’s Collection Wales
Bringing Plas Newydd to life
Mary Carryl. Source: National Library of Wales via Wikipedia
Shortly after moving in to Pen-y-Maes cottage the ladies renamed it Plas Newydd, meaning new hall (plas translates roughly as country hall or small manor) and lived there for 50 years. Their retinue was headed by Mary Carryl, the strong-minded Irish maid from Sarah Ponsonby’s home who remained with them as both employee and close friend until her death in 1809. Mary had been known in Ireland as “Molly the Bruiser,” and Eleanor mentions hearing a dispute between Mary and a tradesman in which Mary emerged loudly triumphant.
In spite of their financial difficulties, described below, the cottage was evidently far too modest for the expansionist and artistic ambitions of the ladies. In their hands, from the moment they arrived, it underwent a series of remarkable transformations. For example, in 1785 they built a small dairy to the west of the house; sections of interior floor tiles were replaced with stone in 1788, when new carpets were also ordered; repairs to the roof and indoor varnishing and painting took place in 1789; and, in 1792, work included plastering and whitewashing, and the addition of a new cellar, a new room and walls in the garden.
Detail of the porch, installed in 1814, with one of the twin lions contributed by Arthur Wellesley
The work to transform the house from traditional Welsh cottage to artistic extravaganza began in around 1798 and was initially inspired by gothic architecture, primarily the pointed lancet arches that characterized their oriel (projecting) windows, the carved wood that framed them outside. They also introduced stained glass, which was eventually installed in all the most important rooms. The spectacular porch was installed in 1814 , complete with seating, carved pillars, a canopy, elaborate carvings and lions supplied by the Duke of Wellington. A porch-warming party celebrated its installation. As well as the corner seats that resembles those in church porches, the front door showed the four evangelists together with the symbols with which they are associated, the underside of the vaulted canopy resembles the chapter house at Valle Crucis Abbey. The 1988 guide book says that the window canopies over the lancet-shaped windows were a gift from the Duchess of St Albans, although it does not add how it came by this information or, for that matter, the Duchess of Albans might have come by the carvings. The guide book adds that they show scenes from Greek, Eastern and Hindu mythology.
The stained glass “prismatic” arch between the dining room and library
Other additions were gothic style doors, sash windows, painted glass, and a “prismatic lantern arch” leading from the dining room into the library. The ladies also filled the house with objects that fascinated them. They were particularly proud of an aeolian harp (a multi-stringed harp that plays itself in the wind – see the video at the end of this post), and their vast collection of books. As early as 1795 poet Anna Seward referred to house as “the enchanting unique,” talking about the library of books in multiple languages. Although neither lady spoke Greek or Latin, Eleanor spoke fluent French and they taught themselves Italian and Spanish. Thirty years later another visitor, John Lockhart, wrote to his wife in 1825:
But who could paint the prints, the dogs, the cats, the miniatures, the cram of cabinets, clocks, glass cases, books, bijouterie, and whirligigs of every shape and huge – the whole house outside and In (for we must see everything to the dressing closets covered with carved oak – very rich and fine some of it – and the illustrated copies of Sir W’s poems [quoted in Mavor 1984]
Window canopy and surrounding panelling
From around 1814 the ladies began to collect wood carvings, most of which were Elizabethan-Jacobean style (late 16th-17th century), and with which they panelled their home in a random but fascinating patchwork. These are most evident in the hallway, the staircase, and the first landing as well as on fireplace surrounds and doors. It is clear that furniture from churches and grand homes had been dismantled to provide many of these panels, which make up a wild jigsaw of imagery, emblems and patterns. This remarkable project was preserved by successive owners and supplemented by General Yorke, who converted the kitchen into the Oak Room.
Walking from the little summer house, via steps and rustic fencing, towards the stream in 1835. Source: People’s Collection Wales
The ladies were also very active beyond the house, fulfilling their ambitions to create lovely gardens, both ornamental and practical, with floral and kitchen gardens. These gardens, as well as the stream-side walks, became as famous as the house itself. As well as shrubs, ornamental trees and flowerbeds they grew herbs, fruit and vegetables. In 1789 they were able to list 43 different rose types planted in the garden. One of the regular expenses listed in their accounts was “muck” to fertilize these new additions.
Ornamental elements extended into the garden, inspired by romantic landscaping publications of the day, eventually including a rustic “bower,” rustic wooden bridges over the stream, a stone shelter next to the stream built for a font liberated from Valle Crucis, a summerhouse above it, rustic fencing and other little tweaks to complete a perfect extension of the house and its gardens. Even the natural arrangement stones in the stream was considered to be displeasing, so workers were employed to reposition them to form a more suitably romantic scheme. These ornamental features were influenced by the French book on the subject which they had in their library.
Although the gardens have been lost in their entirety, partly due to both the Yorke and Robertson extensions, it has been possible for Denbigh Council to recreate some of the ornamental features portrayed by Lady Henrietta Delamere in her sketches, and these really do capture the sense of how the woodland walks must have looked.
The summer house, rustic fence and the grotto-style structure containing the stone font, reached by a bridge over the stream
Living
The original watercolour of the two ladies by Mary Parker / Lady Leighton is now in the library at Plas Newydd. Source: People’s Collection Wales
In spite of their spending, the ladies were provided with only small incomes from their families after their departure, and money was a constant worry. The ladies had ambitions for the house that far exceeded what their finances permitted, and regularly overspent. The small annual amount supplied to Lady Eleanor by her very wealthy family almost certainly reflected their profound disappointment in her, which some of her letters to them only served to exacerbate. Miss Ponsonby’s guardian was not as wealthy but she provided Sarah with a small income, and after her death, Lady Betty’s daughter Mrs Tighe continued to provide Sarah with a small but generous allowance in spite of her own periods of financial difficulty. In spite of hopes that Eleanor might inherit a significant sum from her parents when they died, she was to all intents and purposes disinherited; her father left her nothing and her mother left her only £100. Nothing was forthcoming when her brother succeeded to the family title in 1791. For much of her time in Llangollen she was convinced that she had been denied a right to a far more substantial amount by the terms of her brother’s marriage settlement, a source of ongoing bitterness. A small pension provided to the ladies by the state was very welcome, but unreliable. A second pension added sometime later was of considerable help, but it too was unreliable. They often had to request loans from friends, which they sometimes had difficulty repaying, and they were always worried about how to pay their debts to tradesmen. On several occasions they were late with their rent. The lack of financial stability is reflected in the many references to their financial embarrassments in Lady Eleanor’s journal, Miss Ponsonby’s accounts and many of their letters, but does not seem to have prevented lavish spending on both the house and on servants and labourers. The risk of investing so much money and love on improving rented accommodation was demonstrated in 1800 when their landlord, the son of their original landlord, attempted to evict them. Legal steps were taken, and the disaster was averted.
Plas Newydd. Source: People’s Collection Wales
The ladies did take some measures to take advantage of their rural location to become dairy and horticultural producers. They acquired a cow called Margaret in the 1780s, with three others eventually making up a small herd, and put some of their land down to potatoes which they were selling from at least 1797; barley from 1798 and from 1801 they began to sell butter. Harvesting hay was an annual occurrence, some of which was used for feeding the cows, but some of which may also have been sold. They built a poultry yard and had a kitchen garden which was quite clearly overflowing with produce including fruit trees, strawberries, raspberries, gooseberries and melons. Vegetables included cucumbers, peas, mushrooms, potatoes, asparagus, artichokes and cabbages. Of course there were overheads. They were renting some of their land, had to pay for labour to work their horticultural projects, and they were purchasing fruit and vegetable stock and large quantities of muck as fertiliser, but it says much for them that they gave self-sufficiency in food and the sale of surplus their best efforts.
Local connections and the roll-call of visitors, both welcome and unwelcome, meant that they were far from isolated. They were introduced to the upper echelons of society in Llangollen and further afield by Lady Dungannon who lived in Brynkinalt near Chirk, made extensive use of the various services offered by the towns-people, and employed a number of servants inside and out. Eleanor’s spiky personality put some of these relationships at risk, such as their valued friendship with the Barrett sisters Elizabeth and Laetitia and Miss Margaret Davies of Cae Glas, Oswestry; and relationships with townspeople employed by them were frequently tested to breaking point, exemplified by their dispute with the landlord of The Hand Hotel, but they continued to form an important element of the Llangollen social landscape. As they became tourist attractions, they became part of the economic reality of the town until the deaths of Eleanor in 1829 and Sarah in 1831. The occasional fireworks emanating from Eleanor were apparently taken in the town’s stride, possibly due to Sarah’s more amiable personality.
The Ladies of Llangollen, Sarah left and Eleanor right, with the Valle Crucis font and the Gothic-style shelter surrounding it. Source: People’s Collection Wales
The duo became increasingly unconventional and very distinctive in appearance. They wore riding dress all year round, and they both wore black beaver hats over cropped hair. This was probably very practical for the lives they lead, but made them stand out, drawing attention. They were described in 1820 by Charles Matthews in a letter to his wife as “dear antediluvian darlings attired for dinner in the same manified dress, with the Croix St Louis, and other orders, and myriads of large brooches, with stones large enough for snuff-boxes, stuck into their started neckloths.” Matthews also refers to their powdered hair, black beaver hats and says that they “looked exactly like two respectable superannuated clergymen” (quoted in Mavor 1984). The only authenticated portrait of them was made clandestinely by Mary Parker, later Lady Leighton, a visitor from Oswestry and amateur artist. She sketched it in pencil under the table at Plas Newydd when she visited in 1828, later converting it to a water-colour, and still later it became an engraving. A lithograph by Lady Henrietta Delamere became popular but it is not known whether it was taken from life; I suspect that it was based on Mary Parker’s painting, because the heads and faces are at exactly the same angle as the earlier portrait.
The ladies loved to walk, and had a number of favourite circuits, both short and long, of which they were particularly fond, spotting wild flowers, identifying bird song and picking blackberries in the hedgerows. As well as the exotic artifice that they constructed in house and garden, they loved what nature offered on their doorstep, and is a running theme in Eleanor’s journal.
Sunday January 17th. There is no describing the blazing beauty of the Morning. All the Mountains a glorious Purple and Gold. Woods Sparkling with Gems. Smoke Silently Spinning in Columns to Heaven – chorus of Birds Hymning their Thanksgiving in every Thicket – tender Transparent Mist Exhaling from the River and Brooks – the Hoar frost Melting before the Suns Brilliant rays and disclosing Such Verdure.
A poem for the two ladies “To The Lady E. B. And The Hon. Miss P.”, written by Wordsworth after a visit in 1824. Source: The Simple Poetry website
Although the idea that had lead to their choice of home was one of peaceful retirement and idyllic retreat, this became more a matter of theory than practice after they became well known. Soon news of their unconventional lives and appearances and their remarkable house and gardens spread. They had located themselves in a beautiful part of Wales that was becoming a popular tourist destination, and were positioned conveniently close to Llangollen town centre. They became a tourist destination in their own right, attracting well known names of the Regency and early Victorian periods, insisting that potential visitors request access in writing to introduce themselves. There is a dauntingly long list of known visitors on the Early Tourists in Wales website, amongst whom were, in no particular order, the Duke of Wellington (at the time merely Arthur Wellesley), the Duke of Gloucester (nephew of King George III), William Wordsworth, the poet Anna Seward (a firm friend), Sir Walter Scott, Mary Berry, Caroline Lamb, Charles Darwin, Mr and Mrs Piozzi (Mrs Piozzi was the former Hester Thrale, who was close to Dr Johnson and was another firm friend), the Duke of Somerset, Sir Humphry Davy, Robert Southey, Prince and Princess Esterhazy, the Duke and Duchess of Northumberland and Josiah Wedgwood. The January 1788 visit by Arthur Wellesley was commemorated with an inscription on the fireplace overmantel in the kitchen, now the Oak Room, with the initials EB and SP and the date 1814. Wordsworth composed a poem for them after his 1824 visit, although his reference to Plas Newydd as “low roofed cot” caused more offence than pleasure. The multitude of visits was all the more impressive given that Telford’s road between London and Holyhead did not fully open until 1826, and the railway did not reach Llangollen until 1862.
Initially renting the house, gardens and surrounding woodlands and fields, the ladies were eventually able to purchase the property in 1819 from the son of their original landlord, although given their constant shortage of funds, together with the lack of any records of where the money came from, it is not currently known how they could have afforded the purchase price. One suggestion is that the funds left to Sarah Ponsonby in Mary Carryl’s will when Mary died in 1809 was the source of at least part of the sum. Eleanor’s journal makes references to ongoing improvements in their financial situation, so perhaps they were left a bequest by some unnamed benefactor. ===
Endings
The memorial in St Collen’s churchyard to Eleanor Butler, Sarah Ponsonby and Mary Carryl. Source: Coflein
Eleanor died on 2nd June 1829 at the age of 90 and Sarah only three years later on 8th December 1831 at the age of 76. No cause of death for either seems to be known. Many of their closest friends and most of their family had predeceased them and it must have been a strange two years for Sarah, after Eleanor’s death, with no remaining family or close friends nearby.
Both ladies were buried in St Collen’s churchyard alongside Mary Carryl, with whom they share an unusual triangular monument. A week-long auction followed Sarah’s death, taking place in 1832, selling off everything that was not actually a fixed part of the house itself. Over 1000 books were sold, together with their furnishings. Most of their paperwork, including journals, household accounts and letters were apparently disposed of, and only a few of these now survive. Their gardens were largely destroyed when new extensions were added by subsequent owners, although Lady Delamere’s watercolours preserve aspects of the romantic woodland and stream-side walks.
Legacy
Chase of the Wild Goose book cover. Source: Good Reads
Their legacy is mixed. Souvenirs were made and widely distributed, and these are of some interest as components of tourism history. The ladies are now celebrated as the owners of the lovely and unconventional Plas Newydd, once again a major tourist attraction. At the same time there has inevitably been some debate about the nature of their relationship. It has been variously proposed that they had sisterly connection, that they were lesbian lovers, that their mutual affection was romantic but not sexual, or that they were simply inseparable kindred spirits. Apart from their shared lives and shared bed, which are hardly conclusive indicators, there is little to indicate which is the best theory.
In 1936 Dr Mary Louisa Jordan wrote Chase of the Wild Goose, a fictional account based loosely on the lives of the ladies, published in 1936. Dr Gordon used the basic story of the ladies as a platform to create a narrative about lesbian living, and it was republished in 2023. Its author was responsible for a plaque to the two ladies in Llangollen’s St Collen’s church.
In 2022 a play called Celebrated Virgins by Katie Elin-Salt and Eleri B. Jones staged at Theatre Clwyd in Mold, based on the story of Lady Eleanor and Miss Ponsonby, suggested to one reviewer that it was “palpitating, more narrowly insistent on sexual yearning and the importance of acknowledging exchanges which were once forbidden” (Susannah Clapp in The Guardian) but this seems to be a minority interpretation, even by other reviewers of the same play in the same newspaper.
Whatever the case, the matter of whether their love was purely idealistic, romantic or had a sexual component seems, quite frankly, much less interesting today than could have been when they were alive and when they were accepted in the narrow society of Llangollen and the wider, more varied society of those who visited from London and elsewhere. In the late 18th and early 19th century they seem to have been accepted for who they were rather than what they may have been. Their eccentricity made them the subject of discussion, but they lived without scandal. ===
After Sarah’s 1831 death all the contents of the house were auctioned off over a week-long period in 1832. The house was subsequently sold to another two spinster ladies resident in Llangollen, Miss Amelia Lolly from Manchester and Miss Charlotte Andrew from Liverpool. They seemed to have decided to model themselves on Eleanor and Sarah, probably unaware that Eleanor, typically satirical, referred to them derisively as “the Lollies and Trollies,” a play on the names Lolly and Charlotte.
The new owners added a stuffed bear to the porch, which would probably have prompted an extremely acerbic comment from Eleanor. They do not appear to have modified the house significantly, although they must have had to refurnish it. They may, of course, have bought some items originally installed in the house at the auction following Sarah’s death, but they also presumably moved in their own furniture. Their intention seems to have been to maintain the house in the condition in which it was left after the auction, and to benefit from its fame. Under their tenure the house appears to have been run along the lines of a minor tourist attraction, with showings of the house organized for visitors. It is not known whether they looked after the shrubberies and kitchen gardens, or the woodland features. Whilst the house may have remained intriguing thanks to the lingering echo of its former owners, the absence of Lady Eleanor and Miss Ponsonby as its hosts probably reduced its curiosity value for tourists quite considerably.
Miss Andrew died in 1854 and Miss Lolly in 1861. Both were buried in Llantysilio churchyard. In 1864 a church window was installed in the church of Llantysilio in memory of Charlotte Andrew, showing Timothy reading the scriptures, fulfilling Paul’s command to him. This window was moved to Trevor Church in 1893.
The house was bequeathed to a relative of Miss Lolly’s, a Mrs Couran, who owned it for some 15 years before selling it in 1873, when it was apparently leased. In 1876 it was sold briefly to a new owner before being sold on to General John Yorke in May of that year. General Yorke was an enthusiast for the precedent set by Lady Eleanor and Miss Ponsobny, and built on their legacy with enthusiasm. ===
General John Yorke
It was not until the purchase of the building in 1876 by General John Yorke C,B., son of Simon Yorke II of Erddig near Wrexham, that the vision of Lady Eleanor and Miss Ponsonby was significantly reinforced with new material. The General had known the ladies as a child when, having fallen from his pony, the ladies had picked him up, ensured that he was in one piece, tidied him up and sent him on his way with pockets full of oranges. He clearly remembered them with great fondness.
General John Yorke
General Yorke (1814–1890) began his military career in the British Army in 1832, rising through the ranks. He was left permanently lame in the Crimean War in 1854 due to a traumatic and irreversible injury to his leg, but continued to serve and was repeatedly promoted, being made a full general in 1877. He continued to have a role in the military until his death.
The General purchased the house in 1876, 45 years after the death of Sarah Ponsonby, and began to make major alterations that were, however, partially in keeping with the character of the building as left by Lady Eleanor and Miss Ponsonby. Thanks to his greater resources, his vision was even more elaborate and adventurous than those of the two ladies. The ladies might have been just as extravagant had the means been available to them, but General Yorke seems to have followed very efficiently in their footsteps.
The black wooden battens with urn motifs that emulate half-timbering date to its ownership by Yorke. Oblique photographs of the extension added by General Yorke survive, showing how the new wing was at an angle to the original cottage, creating an L-shaped plan. The extension was removed in the early 1960s due to dry rot.
The new wing added to the side of the original building by General Yorke showing how he continued the tradition of wooden window frames and canopies and exterior panel work and added his own mock-Tudor half timbering. Source: The Sketch, 15th April 1903, The British Newspaper Archive
Inside both old and new buildings, General Yorke had both the means and the inclination to extend the collection of Jacobean oak, as well as introducing painted leather, and eventually lined nearly every wall on the ground floor that was not otherwise adorned with oak with impressed and painted leather and lincrusta wall paper. His main contribution to the original cottage was the Oak Room, which is a richly ornate celebration of Elizabethan-Jacobean wood and leather work. Built in what was the kitchen when the ladies were alive, the oak room became both a drawing room and display area. General Yorke’s kitchen was located in his new wing, shown above. An inscription over the fireplace with the initials of the lady with the date 1814 and the stained glass are the only original pieces remaining. As well as 17th century wall hangings made of gilded leather, and 19th century lincrusta wallpaper, the dominant feature of the room is a canopy of wood over more wooden features and a carved oak settle said to have come from a Spanish monastery, although no details are available about which monastery or how it was supposed to have been acquired by the general. It is flanked by ornate leather wall hangings. The photograph below shows it on the left, and there is a more complete view further down the page. There are also two panelled recesses, one of which incorporates a pew that belonged to the ladies and is said to come from a Llangollen church. The main door into the room is also carved and there are carved cupboard doors. All the fabrics and furnishings are part of the refurbishment of the building.
Detail of the Oak Room showing both carved oak and gilded and painted leather work
=== The gorgeous delftware tiles are thought to have been installed by the general, and it seems probable, although I cannot find any specific reference, that the magnificent ceilings were also installed by General Yorke. Yorke’s approach has been described as “antiquarian” and there is certainly something of the Victorian gentleman collector-cum-historian about General York’s approach to making Plas Newydd a repository not only of decorative arts but also of curiosities, much in the style of Lieutenant General Augustus Henry Lane Fox Pitt-Rivers. This is the impression that it made on John Murray, who described it as follows in his Handbook for travellers in North Wales, (5th edition, 1885, pages 19-20, quoted on the Early Tourists in Wales website:
The veteran officer who now owns Plas Newydd, has not only zealously preserved it with all its quaint decorations within and without but has greatly added to its curiosities in the way of old furniture, pictures, painted glass, and sculpture – those in ivory executed by himself. He has in fact converted the house in to a Museum of Vertu, a sort of Welsh Strawberry Hill, for the which, as well as for the singular beauty of the spot, Plas Newydd is well worthy of a visit. Visitors pay a fee of 6d., which goes to some local charity.
A postcard of the house shows the library with some of the carved ivory work mentioned above protected by glass domes. There is barely a free surface in the place. Another postcard, of the Oak Room, shows the extensive carvings and leather-work. Pity whoever had to keep this lot clean and dust-free!
The Coflein website says that by the time Yorke arrived at Plas Newydd the ornamental garden and woodland architectural features, all made of perishable materials, had “fallen into decay,” but what was left of the gardens appears to have remained well stocked whilst he was there. The photograph further up the page showing his new wing certainly shows what appears to be a well-stocked flower bed had been added in front of the new wing. The wonderful mock-Tudor water tower in the gardens was one of General Yorke’s additions, and the Coflein website says that where the 1958 ‘Bards’ Memorial’ of 1958. now stands used to be the site of General Yorke’s peacock house, which I would have liked to have seen.
General Yorke’s water tower at Plas Newydd
George Hunter Robertson
George Hunter Robertson. Source: Bygone Liverpool via from London and Lancashire Fire Insurance
The house was sold to George Hunter Robertson of Liverpool in 1890, a wealthy cotton broker who owned the house until 1910, and added his own personality to it. He apparently shared it with his brother. He was recorded as a member of the Cumberland and Westmorland Antiquarian and Archaeological Society in its 1875 edition. His addition of a new wing at Plas Newydd built to emulate the style of General Yorke demonstrates that like General Yorke, he had an antiquarian interest in re-assembling components of the past.
Even with General Yorke’s large extension, the property was too small for its new occupant, and he added another wing, this time in a line with the original cottage. This was provided with some pseudo half-timbering, but of a less elaborate type than that of General Yorke. It looks as though it had a flat roof, or at least a very shallow hipped roof, making its appearance in photographs look most peculiar, almost an afterthought. As with General Yorke’s extension, this was removed in the early 1960s due to dry rot, and the end of the original building was provided with a simplified half-timbered appearance to blend in with the frontage, which it retains today.
View of Plas Newydd showing the addition of a new wing, without the hipped roof of the older cottage. General York’s wing can just be seen at far left. Also visible is the new formal yew garden. Source: The National Archives, ref. INF 9/641/7
According to Coflein, it was Mr Robertson who created the formal garden with its golden yew shrubs and box-hedging. The yew garden incorporates the base of a cross on a stepped plinth, which is said to have been the 15th century Chester marketplace cross, although I have seen nothing to confirm that this is the actual provenance. Nearby is a font said to be from Llangollen parish church. I remain unclear about whether these were acquired by the Robertsons or were already there, although the font from Valley Crucis, built into a little shelter by the side of the stream was an acquisition of the ladies.
In 1908 a Gorsedd stone circle with a flat stone at its centre was erected on the lawn just beyond this formal garden for the Llangollen hosting of the National Eisteddfod. The Gorsedd circle was a traditional element of the Eisteddfod celebration of Druidic traditions, and was used to host associated ceremonies.
Gorsedd circle with Plas Newydd beyond and Castell Dinas Bran on top of the hill in the background
After the Robertsons, the house was sold to Mrs G.M. Wilson who lived in it until 1918. It was sold in 1919 to the 7th Earl of Tankerville whose son sold it to Llangollen Town Council in 1932.===
Plas Newydd 1930 – 1960s
Plas Newydd immediately following the destruction of General Yorke’s wing in the 1960s following the discovery of extensive dry rot. Source: People’s Collection Wales
In 1932 the property was purchased by Llangollen Town Council for £3320 after they had secured a loan to do so, a superb decision. It was opened to the public a mere year later in 1933.
The wings of Plas Newydd, built by General Yorke and the Robertsons, were occupied in 1934 by the Welsh National Theatre, but in the 1960s they were both found to have pervasive dry rot and had to be knocked down. Dry rot, which usually finds a home in damp wood, is a fungus, the appropriately named Serpula lacrymons (loosely translated as creeping tear-maker). It is catastrophic if not caught early enough, disintegrating wood and causing destruction of structural integrity. It is the sort of discovery that plunges the owners of old houses into terror, and it is not at all surprising that in order to save the core of Plas Newydd the wings were removed. It is a crying shame but probably the right decision. The salvaged antique wood and furniture were sold at that time.
Plas Newydd Today
The house is run today by Denbighshire County Council as a visitor attraction, and they do an absolutely splendid job. The house and its contents are absolutely sparkling.
Although the 1832 auction removed all of the free-standing furnishings and individual objects owned by the ladies, a few are now on display at the house. These include a pair of embroidered shoes thought to have been worn by Lady Eleanor and embroidered by Sarah, who was an indefatigable embroiderer whilst Eleanor read to her from their extensive library. Replacement items have also been sourced to emulate the earlier contents, including furniture and objects that would have filled the house. One or two of these were mentioned in the journal, including an aeolian (wind) harp. These help to give a sense of how the house would have looked in the late 18th and 19th centuries.
Woodland walk leading from the rear of Plas Newydd through light woodland and leading to Lady Eleanor’s bower and then down to the stream
The gardens are worth a walk around but would probably not be recognizable to either the ladies or General Yorke. I suspect that General Yorke’s extension, which was quite a substantial affair, sat squarely over part of the gardens as they had been when the ladies had the property. There is so little known about Amelia and Charlotte that it is not known whether or not they maintained the gardens. The original yew garden at the front of the property dated to the occupancy of Mr Robertson and his brother (1890-1910), and there are some attractive woodland walks, but the earlier gardens with their considerable investment in flower beds and shrubberies, where the ladies used to sit and read, are now lost. Following Mr Robertson, there was at least one period when they house was not used as a permanent residence, and as anyone who has owned a garden will know, given half a chance nature will revert any formal garden to a far more chaotic state. Fruit trees and ornamental shrubs, too, have finite lives which, although they can run into many decades, will not last eternally and will eventually need to be replaced with new stock. Whilst notes were made in the journal of some of the plantings and comments about them survive in visitor letters, nothing remains to suggest how these gardens were arranged and what they looked like.
At first glance I thought that this was the library at Plas newydd, but it is clearly not. This does not match any of the rooms in the current cottage, so must have come from one of the two later wings, probably from the time of General Yorke when the house was run as a museum. Source: RCAHMW
Final Comments
Plas Newydd does a very good job of speaking for itself. It is quite amazing that it remains in such good condition after the deaths of Lady Eleanor and Miss Ponsonby, subsequently preserved by Miss Lolly and Miss Andrew, elaborated and extended by General Yorke, and further extended by Mr Robertson. It is a real shame that the two wings, added by General Yorke and Mr Robertson respectively, had to be destroyed, as they were an integral part of the story of Plas Newydd, but it is a mercy that the original cottage remains.
The aesthetic ideals adopted by the two ladies and preserved by subsequent owners, first emulating the Gothic and then the late Tudor and Stuart periods, using salvaged carved wood and stained glass and other decorative arts, is not to everyone’s taste. In her book The Ladies of Llangollen, the main biographer of the ladies, Elizabeth Mavor, commented on the “regrettably” added oriel and canopied windows, described their porch as “a rich and appalling riot of carving” and referred to General Yorke’s contributions as “mistaken alterations,” but whether it appeals or appals, it is still a remarkable vision, quite unique, and it is a fabulous place to visit. I love it.
==
Visiting
My thanks to Helen Anderson for driving us on our first visit, which always gives me the chance to sit and enjoy the scenery, a real treat.
Plas Newydd sits just above Langollen, just off the A5, and is very easy to find. I tapped the postcode (LL20 8AW) into the Google Maps SatNav and it took us straight there. Although very near the town centre, a short way up a hill, there is no sense of being so near to the town and its surrounding residential areas. Beyond and above the house, and looking sensational, are the ruins of Dinas Bran castle. In front of it is a formal rose garden within yew hedges, and beyond there are cleverly shaped topiary trees, with an early 19th century Gorsedd stone circle beyond, created for the 1908 Llangollen Eisteddfod. It is a very attractive location.
Parking seems to be confined to the approach lane and around the circular drive itself. We were there quite early on an overcast weekday morning in July and were able to park, but it might be more of a challenge at a busier and sunnier time as there does not seem to be an overflow car park.
Tickets are available in the nearby café and shop. You go to the counter where food is paid for to buy your ticket for the house (the grounds are free of charge to visit). See the website for seasonal opening times and pricing information but do note that the house closes completely off-season (in 2025, for example, it opened on April 1st). There is a lovely café, also seasonal, where the ticket offices is located, which was serving some splendid looking meals, both indoors and out. If you do a web search for Plas Newydd do make sure that you are looking at the site in Llangollen and not the National Trust house of the same name on Anglesey.
A pair of embroidered shoes reputedly worn by Lady Eleanor Butler. Source: People’s Collection Wales
The ticket price includes an audio device, if you would like one, which you touch to a receiver in each room to hear details as you go around. It is not absolutely necessary if this is not your cup of tea as there are other information sources, but there is some very useful information in the recordings that I had not found elsewhere. There is an exhibition room on the first floor, far right, if you want to see some very useful background information before you start, which acts as a miniature visitor centre, containing objects belonging to the ladies. There are also plenty of laminated information sheets to pick up and read in each room as you walk round, in English and Welsh, and lots of ring-binders to open with plenty more details about the house and its owners, including excerpts from Lady Eleanor’s journal and pages from the auctioneers sale of their books after they died.
Plas Newydd dining room table, set up with loose-leaf folders and laminated pages in English and Welsh for visitors to read. Take a look at the long, long listing of the books that were auctioned after Miss Ponsonby’s death.
On a nice day there are many walks on public footpaths that start from Plas Newydd, some of which retrace the steps of the two ladies, who were enthusiastic and energetic walkers.
View of “the dell” showing the stream that runs along the valley next to Plas Newydd in around 1835. Eleanor and Sarah had passed away in 1829 and 1831 respectively, but one of their ornamental bridges, now replaced with a stone one, was still in service. Source: People’s Collection Wales
My personal sketch of the grounds, scribbled for my own benefit before my April visit, is based on the one printed in the guide book published in 1988. I’ve used it to find my way around, and the paths, coloured in orange are still where marked. Of course feel free to use it, but it has nothing to do with anything faintly resembling scale! It took me about 30 minutes to do the full circuit, but I was stopping to take photos. It is pure laziness that I didn’t do something a little more dignified in software, or even sketch it out more neatly. Plas Newydd is the big purple rectangle at top left and the yellow blobs next to it represent the yew trees of the formal garden established during Mr Robertson’s tenure. The green blobs are trees, and I think that the rest is pretty much self explanatory. The house is on a hill, so there is a slope from the level of the house down to the stream. If you don’t fancy the walk you can still stand in Lady Eleanor’s reconstructed bower and look down on the stream and the flanking woodlands. Don’t miss the stone font said to be from Valle Crucis Abbey, marked at bottom right. The garden and woodland walks are lovely, because of the wild flowers, which in early spring include swathes of purple crocus on the grass in front of the house, and later on, blankets of primroses, snake’s head fritillaries and fresh white blossom. In the dell, beside the bubbling stream and its little water falls, are endless carpets of white-flowered wild garlic and bluebells.
===
For people with unwilling legs, be warned that to get the full value of the house there are quite a few stairs to negotiate, and there are no elevators or other methods of ascending to the upper storeys. The flight of stairs leading to Mary Carryl’s room in the attic is particularly steep and narrow, although the stained glass is worth the trip. Failing the stairs, the ground floor alone has plenty to see, including many of the best features. The gardens are easily accessible via well maintained gravel paths, but the woodland and stream-side walks require a bit more careful footwork via sloping gravel paths. With care, these are very accessible.
Valle Crucis Cistecian Abbey, founded 1201, a beautiful and peaceful site run by Cadw. Check opening times as it is only open on certain days during the season.
This could easily be turned into a day trip. Just a little further afield, and which I have blogged about before, are the Valle Crucis abbey ruins, which is a spectacularly lovely medieval site, with a cache of nicely decorated medieval grave slabs held in the former dormitory. It preserves a lovely chapter house, the interesting abbot’s quarters, a stunning corbelled vestry and many other very attractive features. Also nearby is Thomas Telford’s beautiful Horseshoe Falls, which can be incorporated into a walk along the Llangollen canal. Castell Dinas Bran is accessible both from the town (quite a strenuous walk) and from the panorama road (much less of an effort, with fabulous views from the road, but very narrow with passing places and no official parking). Dinas Bran is on my to-do list for this summer. All of these sites were known by the inhabitants of Plas Newydd.
Pontcysyllte aqueduct, over which the ladies travelled in a narrowboat on its opening day
Slightly further away, but on the route between Llangollen and Chester / Wrexham is the Pontcysyllte Aqueduct, the opening event of which the ladies, as local notables, attended on the second of the boats in the official ceremony, sailing over the aqueduct. The towpath, shown left, is usually quite busy on a nice day, but is shown here completely (and somewhat eerily) free of visitors. The views over the rail are exceptional.
In Llangollen itself, options include a steam train trip, a canal boat cruise, a short stroll along the river promenade, and the tiny but well-stocked town museum (but check opening times), and there are plenty of places to stop for lunch. In the summer I recommend that if you want to eat at somewhere particular in Llangollen you book a table in advance or you may find yourself stuck. ===
=
Sources
A note on sources of information
Most of what is known about Eleanor and Sarah comes from their own diaries and accounts, as well as letters they wrote and letters written by others in which they were mentioned. In her book The Ladies of Llangollen, Elizabeth Mavor provides details of all of the available resources that she was able to consult for that book, and although that book was published in 1971 most of the privately held collections of letters that she was able to consult have yet to be digitized and made available online; Others that are retained in libraries like the Bodleian, the John Rylands and the National Library of Wales have likewise not yet been made available online. Combined, the correspondence covers some of the years between 1790 and 1831. Although Eleanor’s journals have become the main source of information about their lives, many months and years are missing. Samples of the diaries are contained in files that can be browsed within Plas Newydd itself, and a selection of entries have been published in Elizabeth Mavor’s 1984 hardback A Year with the Ladies of Llangollen (published in paperback under the title Life with the Ladies of Llangollen, although it is exactly the same book). Of Sarah’s journals nothing remains except her account of their tour of Wales and the Borders when they first left Ireland. There seems to be very little information about General Yorke, which is a real shame, and nor is there much about the Robertson brothers.
Online, the best resource for primary sources on the subject of Plas Newydd and its various owners and occupants is on the Early Tourists in Wales website, a superb resource that has collated much of the available information. The People’s Collection in Wales has some fascinating images of the cottage and its contents in the form of paintings, photographs and postcards, (see Sources at the end for full details and page links). The Curious Travellers website also has some very useful information to impart, including excerpts from Sarah Ponsonby’s pre-Plas Newydd travels around Wales and Shropshire. The Ladies of Llangollen blog has some if not all of the letters between the ladies and Hester Piozzi (formerly Thrale) and a comprehensive set of those between the ladies and Anna Seward, all available from its Correspondence and Correspondents page.
Books, booklets and Papers
Harris, John. 2007. Moving Rooms. The Trade in Architectural Salvages. Yale University Press
Hubbard, Edward and Pevsner, Nicholas 1986. The Buildings of Wales. Clwyd (Denbighshire and Flintshire). Penguin Books
Mavor, Elizabeth 1971, 2011 (2nd edition). The Ladies of Llangollen. A Study in Romantic Friendship. Moonrise Press. Does not always cite her sources for specific quotations and references.
Mavor, Elizabeth 1984. Life with the Ladies of Llangollen. Viking (hardback). N.B.This was published, word for word and page for page, image for image, in Penguin in 1986 in paperback as A Year with the Ladies of Llangollen. Do not make my mistake of buying the same book twice just because the titles are different! The format is rather strange, in that the information is listed first by month and then by year, so that all the journal entries for January in every given year are listed in the first chapter, and then all for February and so on. I would have found it more informative if it had listed by year, from earliest to latest. I suppose it gives a sense of how each month in all years may have passed, but it gives no sense of the cumulative passing of time over the lives of the ladies and how their lives changed over their time at Plas Newydd.
Veysey, A. Geoffrey and Freeman, David 1980. Plas Newydd and the Ladies of Llangollen. Glyndwr District Council. (16-page visitor guide based on the booklet by Veysey, County Archivist for Clwyd County Council, published in 1988. Two sections were substantially updated by Freeman – the Oak Room and the Ladies’ Bedchamber). —
As today is National Egg Day in the United States, I hopped on the transatlantic bandwagon and decided to make myself an Egyptian egg bamya. I usually do a bamya in an electric slow-cooker with a piece of lamb shoulder or a lamb shank, but it is easy to turn it into a vegetarian dish for a change, by making eggs the star of the show and doing it on the hob. Eggs work brilliantly, and their texture is a great balance to the vegetables and sauce that accompany the dish. This is easy and quick to make and is delicious. Without the eggs, it becomes vegan. Depending on how much harissa and fresh chilli you add, this can be as hot or cool as you like.
To make the base, I used a tagine, which I use for just about everything on the hob, but if you use a skillet or tall-sided frying pan that has a lid, it works just as well. Heat some olive oil, add roughly chopped onion, fennel bulb and ginger, and when warmed through add fennel seeds, garlic, ras el hanout, saffron and harissa (I use the Bart brand), and fresh chilli if required (bearing in mind that there’s chilli in the harissa, and that there will be the option to add chopped chillis added later). When cooked through add tomatoes and vegetable stock and heat through, Then whizz the whole lot up in a blender or food processor. That’s the base sorted. Put it back in the pan and if you have time either leave it for a few hours, or overnight to develop the flavours. When ready to proceed, turn your attention to the vegetables.
Egg bamya, lid off, steam escaping, and nearly ready to serve
For the veg, today I heated up some olive oil and lightly browned courgette cut into discs and okra (bamya is an Arabic word for okra), but aubergines also work well too (with more oil). When lightly browned, but not fully cooked, add them to the pan that is holding the base sauce. A couple of handfuls of spinach or, when in season, ramsons (wild garlic) are splendid stirred in to the base at this stage too. Then, over the top, add preserved lemon slices, sliced fresh red chilli, halved artichoke hearts (beautiful small ones are available from M&S and great Cypressa brand ones in some Co-op branches, both of them in oil in jars; and brined ones in tins are available in all big supermarkets). When in season, apricot halves work well too, Push them down into the sauce.
If you are using a shallow dish, with everything spread out, gently push down the halved or quartered hard-boiled eggs into all the deliciousness, and the job is done. If you are using a deeper saucepan, leave the eggs out for now.
A rather inelegant bowl of the final version – comfort food rather than Michelin star appearance, more ladled in than plated up, and topped with a serious amount of divine coriander and mint from the garden. I could have lavished more attention on the appearance but I was famished, and it tasted super.
If you are using a shallow dish, with everything spread out with the eggs sitting in the top, it all heats through, starting from room temperature, under a lid on a low flamefor around 35 minutes. The captured steam, recycling under the lid, helps to heat from the top as well as the bottom, meaning that you can preserve the look of the thing and prevent the egg yolk dividing from the egg white if you want to plonk it on the middle of a dining table for the visual impact.
If you are using a deeper saucepan, cook the ingredients on a mediumflame for around 20 minutes, drop the temperature to low, and add the eggs for another 7 minutes or so just to heat them through.
A couple of minutes before serving I gently fold in a big handful of fresh coriander, another of oregano or marjoram and a smaller handful of mint, careful not to disturb the eggs. This adds fresh flavour and gently softens the herbs.
To serve, I add a good sprinkling of coriander (see below for alternatives) and lime juice over the top.
To serve on the side, either plain Greek yogurt or tzatziki (Greek yogurt, chopped mint and diced coriander, with a quick squeeze of lime) is superb and balances whatever heat you’ve added with the harissa and chillis. Whipped feta cheese with mint and olive oil is also a great alternative. I find that this dish needs salt. Rice (very good with saffron in the water) or cous cous are obvious additions if you want a filling side dish, and salad works well too.
Lovage growing in a pot on my patio
If you hate coriander, here are three possible alternatives other than flat-leaf parsley. It’s a bit esoteric, but you can buy potted lovage in garden centres, It has an aromatic, slightly citrusy edge that needs to be used cautiously because it is strong, but often works as a good substitute for coriander for those who hate it, although it tastes quite different. Alternatively, and again it has to come from a garden centre, the finely-chopped stems and feathery foliage of fennel are mild but noticeable and work really well as an alternative. Marjoram and oregano are both aromatic Mediterranean herbs that grow brilliantly in pots, and also work well when chopped over the top of this. Both lovage and fennel bought in small pots and planted out into bigger pots with compost grow like crazy, last all summer and are superb. They vanish underground for winter, but reappear in spring, and lovage in particular turns out to be remarkably hardy. Marjoram is more tender and may not survive the winter, but oregano tends to be quite resilient.
The White Horse public house in Churton, some 20 minutes south of Chester and a few minutes north of Farndon and Holt has been closed since the pandemic, but has been the source of some heavy-duty activity over the last few months, thanks to the efforts of its new owner Gary Usher and his crowd-funding business model.
Mike Royden, whose massive and seriously impressive website about Farndon and its environs, Royden History, is one of the best of the region’s history resources, has added a history of the White Horse to his site, with terrific images and explanatory text, tracing not just the history of the building but its various incumbents too. Buildings are far easier to trace than the people associated with them, and this really is a great piece of work using primary sources. Marvellous detective work and a very good read. Whether you are interested in Churton’s history or just the White Horse itself, Mike’s history of the White Horse can be found at the following page:
It was a real eye-opener to see the 1895 photo of the pub’s thatched predecessor, as well as the completely bizarre photograph of the Red Lion, a former Churton pub, in one of its previous incarnations. Thank you Mike!
I took the pics below in February 2022, when the future of the White Horse was very much up in the air. It is great to see it all looking so trim and tidy.
White Horse images from February 2022
The latest chapter in the pub’s history begins when it opens on 3rd March 2023, and I am very much looking forward to taking it for a test drive. Here’s a copy of their sample menu (also snaffled, with sincere thanks, from Mike’s page above).
For more details about the White Horse and its menu, the website is at thewhitehorsechurton.co.uk, which also has links to their Instagram, Facebook and X (formerly Twitter) accounts.
After attending the latest exhibition at the Tŷ Pawb art gallery in Wrexham, which has a handy car park overhead, we popped in to the Polish supermarket just outside the Market Street entrance to Tŷ Pawb. From the outside looks it looks somewhat unprepossessing, resembling an abandoned 1960s post office pasted with advertising flyers, but don’t be put off because inside it is bright and fresh, and as neat as a pin. As well as a range of Polish goodies, I came away with two enormous fresh king oyster mushrooms.
The mushrooms and some excellent bacon that I already had at home cried out to be made into a spaghetti carbonara, with the addition of some fresh parsley from the garden. This is an excellent dish if you are in a rush, because it takes about 15 minutes to cook in total, and the magical thing about carbonara is that the sauce tastes superbly creamy without a hint of dairy approaching it, achieved by mixing egg yolks with some of the starchy pasta water. It is one of my favourite dishes. Simply leaving out the bacon turns it into a vegetarian dish.
My recipe differs from a traditional carbonara in that it adds mushrooms, occasionally uses chunks of ham or bacon instead of pancetta, has a lot of parsley stirred in along with the egg mixture (and often chives and baby spinach leaves or wild garlic leaves too), and has slices of red chilli (raw or cooked) and spring onion discs sprinkled over the top. The chillies are partly for a tiny touch of heat, but also to lend some colour to an otherwise rather bland-looking dish. The pallid colouring is, of course, one of a carbonara’s key characteristics, as is the subtlety of the flavouring, so you may want to leave out the chillies.
If you want a simple, authentic and excellent carbonara recipe, I would suggest you go to the one by Jamie Oliver, which is based on a recipe that he learned from Gennaro Contaldo (so it has a good pedigree). You can find it here on Jamie Oliver’s website.
If you want my version, here it is (for one person, which makes it easy to scale up). For the mushrooms, bacon/pancetta, parsley, spinach etc I don’t use precise quantities, I just chuck in what I feel like on the day, depending on how hungry I am:
As much spaghetti (fresh or dry) as required, but I use about 40g, (which works well with two egg yolks)
Oil, preferably garlic oil. If you are using pancetta, which is fatty but renders down nicely, you can fry the pancetta without oil.
A clove of garlic if there’s no garlic in the oil or if you are not using oil (just to add a touch of flavour, not enough to dominate)
A couple of tablespoons of thick, diced ham, bacon chunks or pancetta cubes
A couple of tablespoons of chopped mushrooms, of the sort that won’t disintegrate when cooked, like king oysters, chestnut or supermarket button mushrooms. I used one whole king oyster mushroom for one person.
An egg yolk per person, or two if you are feeling like a silkier, more indulgent sauce
Parsley, chopped
Spring onions, chopped
Optionally, some softer wild mushrooms for additional flavour, particularly if you are making a vegetarian version
Optionally, parsley, spring onions (chopped), chives (chopped) and/or spinach leaves or wild garlic (ramsons) to stir in
Optionally, red chillies, as hot or mild as you like to top finished dish
If you want to add some interest to a vegetarian mushroom carbonara, some diced or spiralized courgette works wonderfully for texture, and as mentioned above, I like to chuck in a handful of baby spinach leaves and add spring onion and/or chives. Ramsons (wild garlic leaves) are terrific in spring.
With mushrooms, spring onions and chilli
If using dried spaghetti, put this on now. Your packaging will tell you the exact timing, but it’s usually 12-15 minutes from when the water comes to the boil. Fresh pasta only takes around 2 minutes from boiling point, so leave that til you are very nearly ready to plate up. Remember to retain some of the water in which you boil the pasta.
Heat the oil if using and put in your mushrooms.
If using pancetta, cook separately until the fat has rendered down into oil. If using ham or bacon bits, add to the mushrooms to heat through. Stir in crushed garlic, if using
Separate your eggs and mix the yolks together with a tablespoon of grated parmesan cheese, some black pepper and a teaspoon of cold water to loosen the mixture
Add spinach, if using, to the pancetta/bacon with a bit of water to help the spinach wilt
When the spaghetti is ready, add it to the bacon and spinach and stir.
Remove from the heat, Add in the egg-parmesan mix and stir quickly, together with the parsley and chives if using. Sprinkle grated parmesan, spring onions and chilli over the top and serve with a black pepper mill to hand.
The same dish cooked and consumed this very day: minus mushrooms and with bacon lardons instead of rashers, and with wilted baby spinach leaves stirred in.
A French omelette that I made in late Spring, stuffed with a cheese and wild garlic (ramson) béchamel and diced tomatoes with a sprig of ramson flower for decoration. My omelettes are usually browner than this, but this is how I would serve them for anyone else.
I haven’t been doing many Churton egg recipes recently, because I never seem to be passing when the Churton honesty egg stall is out, but I was lucky this week. Like many of my egg recipes, this is dead simple, but none the less enjoyable for that.
A French omelette is a simple fold-it-over affair done in a small frying pan (or omelette pan if you have one), preferably non-stick. It’s much like a pizza made of scrambled eggs, but without as much stirring of the eggs, and folded over to form a holder for the contents (looking a bit like calzone, if we’re remaining with the pizza analogy). The main tweak here is a béchamel sauce that goes in the centre to accompany the other more traditional ingredients. It takes about 15 minutes from start to serving.
The ingredients for this particular version:
2 or 3 eggs
Black pepper
Flour
Butter
Milk
Finely chopped herbs (see below for suggestions)
Cheese of your preference. I used cheddar but it works brilliantly with other hard cheeses like Emmental, and with soft brie types too
Chicken or herb/vegetable sock (optional)
A spoon of crème fraîche or cream (optional)
Ground fennel seeds (optional)
Chopped ham and/or finely sliced butter-fried mushrooms
The cheese béchamel is the first to do (butter, flour, milk and stock). Mine is not a pure béchamel as I always use a chicken or herb stock as well as the milk, meaning that it is part velouté. I also lob in a dessert spoon or two of crème fraîche to give it a velvety texture. Here’s the method: Equal parts of butter and flour are heated on a low heat and stirred together until they are completely mixed into a good, cohesive blob. Keep the heat low. Stock and/or milk are instantly added to the mixture quite slowly to break down the blob and create a paste that eventually becomes a thick sauce, on a low heat. If things seem to be getting a little hot, lift the pan off the heat and keep going with the liquid, reheating when it seems to have cooled down a little. If you want a bit of an edge to the sauce, you can also add white wine, but add a little at a time and ensure that you keep tasting to ensure that the flavour remains balanced, and keep stirring continuously.
Keep the heat low to stop it sticking or cooking too fast, and keep stirring. You can add cheese to make it a cheese and herb sauce, but don’t forget that cheese will be added to the omelette as well, on top of the sauce. The herbs are added when the sauce is thick but still flowing. They need to be compatible with cheese. I used finely chopped chervil, but any herb or combination of herbs that match well with cheese will be perfect, including thyme, oregano, ramson, lovage, marjoram, parsley, fennel or dill. It does need to be well chopped. I ground in some fennel seeds, as they complemented the chervil beautifully.
My omelette was a two-egg, but there is no reason why you shouldn’t do a three-egg. Do take into account that this is insanely filling. I like the omelette itself to be formed of a simple egg and black pepper mix, with just a slosh of milk or a spoonful of crème fraiche, cream or sour cream. This is whisked lightly in a bowl and then poured into bubbling butter in the frying pan. The trick is to leave the egg until the base is just beginning to set and then to move it gently, pulling the edges in, so that the liquid egg flows into the gaps that you have just made. This incorporates the egg mixture quickly and produces a gorgeously textured underside that, when you put it on the plate and fold it over, becomes the exterior.
When the base is just solid enough to add things to the surface, with the top still liquid, the contents can be layered on top, as one would with pizza. Do remember that it is going to be folded, so don’t over-stuff it. In my case I started off with sliced ham (but just-fried sliced mushrooms are also an excellent option), poured the warm béchamel over the top, and then added grated cheese to the top of that. The omelette then needs to heat through, slowly.
I always lift the edges of the omelette with a wooden fish slice to take a peak underneath and check on the colour, as I like mine well done on the outside (a treacly brown colour) but most people like theirs rather less coloured, as in the photo at the top of the post. If the bottom is cooking faster than the top is heating through, you can always hold it under the grill for a minute or two, but be careful if your pan’s handle is not metal. The grated cheese does not need to be fully melted, as it will melt when the omelette’s two halves come together.
Once you have the right colour (the colour you prefer) and the contents are heated through to your satisfaction, simply slide the pan towards the plate, allowing half to rest on the plate before flipping the second half over the top. Alternatively just slip the whole omelette face-up on the plate and use a fish slice to turn one half over the top of the other. The béchamel or béchamel-velouté sauce starts to ooze out of the omelette the moment it hits the plate, and is absolutely gorgeous.
Serve with a salad and/or slices of French bread (or in my father’s case chips) and enjoy.
As the glossy chocolate Easter eggs line up on the supermarket shelves, replacing the eternally dubious Valentine’s Day gifts, I have gone into Churton egg mode, with a Ukrainian slant.
I have an Eastern European recipe book, which is absolutely excellent, and has a few Ukrainian recipes in it. One of them is a stuffed egg recipe фаршировані яйця – farshyrovani yaytsya (or stuffed eggs). Better and inferior versions of this are recognizable over most of Europe, and in 1970s Britain was a particular (very dubious) favourite as a starter, with the mayo mixture sprinkled with paprika and crossed with two salted anchovies.
In the Ukrainian version, the chopped egg yolk is mixed with mayonnaise (my mayo recipe is here), sour cream, as well as finely chopped chives or spring onions. I put my sour cream into the mayonnaise as I was making it I used chives, but I also added cress, and the result was excellent. This mixture not merely stuffs the little yolk cavities but overflows to provide a really good dollop of the mayo mix. Crucially, the egg is topped with caviar (please note – inexpensive Danish caviar). Caviar is salty, which I love, and is delicious.
As I was eating the finished article, I wondered whether the salted anchovy fillets that usually sat on a 1970s British mayonnaise-stuffed egg were attempting to replicated the caviar experience, fishy and salty at the same time. I am not denigrating the 70s version, which might well be worth revisiting
Photographs online show various different ways of presenting the Ukrainian фаршировані яйця. Mine is topped with two chives pointing out at angles, emulating many of the pictures online, and some cress over the top of the caviar, which is nothing like the traditional pictures, but which I liked. I have mine sitting on a fan of wild garlic leaves. If you have the time in your life to stuff an egg, this is a really nice way of doing it 🙂
I have never used food dye before, but just for fun here’s a Ukrainian flag theme, using hard boiled eggs, halved. I simply left hard boiled eggs, halved, with a few drops of dye in cold water in a glass bowl, and left in the fridge for a few hours, checking them occasionally to see what depth of colour had emerged. The yolk didn’t survive intact, disintegrating slowly during submersion, so the result is rather more decorative than edible.
The above is light-hearted, but of course the situation in Ukraine is absolutely no joke. It is peculiar how one’s mind turns to different ways of expressing any possible form of solidarity.
In an authentic assessment of Ukrainian Easter eggs, here’s an excellent link showing how Ukrainian eggs are not merely given a bit of a paint job at Easter, but are provided with remarkable and beautiful designs: https://ukrainian-recipes.com/easter-eggs-discovering-symbolism-of-colors-in-ukraine.html. I really wish that my artistic skills were up to it, but they are not.
With Pancake Day (Shrove Tuesday) coming up on March 1st, here is a recipe of my mother’s. It always feels good to do some of the recipes that I associate exclusively with her, even when I have the devil’s own job reproducing them. I’m not very keen on sweet stuff, so on Pancake Day savoury pancakes are excellent.
Eggs are used in the recipe both in the pancake batter (beaten) and into the pancake filling (hard-boiled and chopped). The chopped egg makes a real difference to both the flavour and the texture of the filling. This is an immensely filling dish. I make one small pancake and serve a light salad to accompany it. It is a great dish for making use of leftover roast chicken, but of course you can grill or fry some chicken (thigh has great flavour) specially.
You may want to pre-heat your grill if it is electric.
Although most of my recipes are gung-ho, pancakes are simply not a suck-it-and-see item. The relative proportions are important. Hence, for two people:
100g plain flour,
190ml milk,
1 large egg, lightly beaten,
1/2 tbsp vegetable oil
a pinch of salt
tablespoon of oil or butter for the frying/omelette pan
The eggs and milk are whisked together with the oil, then poured into the flour and whisked lightly, ignoring small lumps. After a couple of failures on the pancake front, when I first had a go at this, I was told that being careful not to over-whisk the batter was important, and that leaving the batter in the fridge for a couple of hours, giving it a final stir before using, would increase the likelihood of success. This seems to work for me.
Heat the oil or butter in the pan and pour in the batter. Before flipping, it needs to be set well on one side, and I always take a sneak peak to make sure that it is going golden on the underside before flipping with a big wooden spatula.
To make the filling, which I do in advance, and heat through whilst making the pancakes, toss the following in hot oil and/or butter
two large handfuls of mushrooms (they shrink in volume when cooked)
two handfuls leftover roast chicken, thickly sliced or in chunks (or slice up and grill/fry a large chicken thigh)
crushed garlic, to taste (optional)
bay leaf (optional – and remember to fish out before stuffing the pancake)
When the mushrooms begin brown and give off a wonderful aroma, the following are mixed together and thrown in, and stirred just until everything is warmed through:
one or two hard boiled eggs, chopped
fresh tarragon, sage or oregano/marjoram to taste
a big handful of parsley
chopped spring onions or chives, to taste
seasoning to taste (I used salt, ground black pepper, ground fennel seeds and a few chilli flakes)
Next add the following, and stir gently until the spinach begins to wilt and everything is again warmed through:
some chicken or vegetable stock
cream (traditionally double cream, but I usually use crème fraîche, and sour cream also works a treat)
a really big handful of spinach
The filling is added to the pancake, heaped in a line up the middle. The pancake is folded to cover the filling and overlap, and then turned onto a baking tray (which is how I did it for the photo on the right this time last year) or oven-proof dish (the one at the top of the page, which I did most recently) so that the edges are secured underneath. I find that pancakes are so filling that instead of making two, I put additional filling down the edges of one small pancake in an oven-proof dish. Cheese is grated over the top (for my most recent version it was a mixture of Cheddar and Emmental with chilli flakes sprinkled on top) and it all goes under the grill until the cheese starts to melt and go golden-brown. In the summer I scatter over some fresh marjoram leaves from a pot on the patio to provide an aromatic edge. On this occasion I served it with a light side salad drizzled with a mustard vinaigrette.
Notes and alternatives:
I have to take real care not to pour too much batter into the pan, which makes the pancake too thick. A thick pancake results in something really stodgy, quite hard to roll and unpleasant to eat. It needs to be thin and light. Part of the trick is to make sure that the pan is hot enough to melt the butter or heat through the oil, but not so hot that the moment the pancake batter hits the pan it starts to set. It needs time to flow out to the sides of the pan and spread properly before the heat is turned up to allow it to set.
The previous time I did this I noted that the filling needed to be rather oozier than the one I made, because of course the pancake itself is dry, and requires a bit of liquid to balance it. So I was careful not to simmer off too much of the stock and cream, and although it looked a bit too liquid, it actually provided a really good oozy sauce. An alternative would be to make a sauce to pour over it, like parsley and chive, or chervil sauce.
If you don’t have time to fiddle around making pancake batter, or if it always comes out more like pizza than pancake, you can always use pre-made soft tortilla flat-breads instead, which are sold in all supermarkets these days. I’ve had a go, and they work well if they are heated and softened gently in a dry non-stick frying pan just before adding the filling.
Whether using either pancakes or tortillas, if you are using a baking tray and serving on a plate, anything that has fallen out of the pancake during the perilous transfer from grill pan to plate can be served to the side of the pancake. To avoid having to move the pancake from the oven dish or baking tray to the oven, a good alternative is to serve it in individual oven dishes straight to the table, with side dishes on the side.
Alternatives or additions to the chicken in the filling could include pancetta or chopped bacon, sausage-meat balls, or chunks of ham hock, the latter going well with leeks added to the fill. Dijon mustard is a great addition to the sauce for all these.
The basic recipe is easy to convert to a vegetarian recipe by adding extra hard boiled egg and replacing the chicken with loads of wild mushrooms, or/as well as leeks, asparagus, courgettes and/or fennel bulb, and using mustard and cheese to add more flavour to the sauce. A very nice seafood version made with king prawns makes a great alternative by leaving out mushrooms and instead adding fennel, asparagus and/or leeks, and making the sauce super-cheesy. This combination works well with ham hock as well.
Leftover filling can be used on toast for lunch, or served deliciously on a baked potato, with cheese or fresh parsley sprinkled over the top. I often make more than I need deliberately to use in this way, and this is my plan for Shrove Tuesday. I have a wood burning stove, and a maris piper spud wrapped in foil and chucked in for 45 minutes works wonderfully. Even with the foil, the smoked wood flavour penetrates and is wonderful.
Avgolemono, meaning egg and lemon in modern Greek, is both a soup and a sauce. As a slightly thickened sauce it goes wonderfully with fish or chicken, but it sings at its most sublime as a soup, with a handful of white long-grain rice and gently simmered, and a handful of chopped parsley thrown in at the end. It is an utterly divine and life-changing taste-bud experience.
I first had it on Kefalonia in 2004, preceding an equally divine order of flame-grilled octopus tentacles, sitting on the restaurant’s outdoor terrace, watching the sun set slowly and spectacularly over the hills, and although the wine was seriously rough around the edges, I cannot remember the last time that a meal felt so perfect in all its parts. It was on Kefalonia that I fell head over heals in love with Greek cuisine, but that particular meal remains my favourite.
Sunset on Kefalonia, 2004
I have reproduced the meal many times since. Frozen octopus tentacles were available prior to lockdown in a Portuguese shop in Wrexham. When I lived in Aberdovey my father used to lob a pack in his rucksack for me, and it was always terribly exciting to collect it. Octopus has to be tenderized before it can be eaten, and the freezer is one of the best ways to achieve this, so frozen octopus is always a good buy. Not having ventured into that part of Wrexham since lockdown eased, and unable to get it anywhere else, I’ve had to abandon octopus for the time being, but the avgolemono soup needs no special ingredients. It does need good quality ingredients, but not special ones, which is the usual story with Greek cooking.
The recipe that I first used for avgolemono is the one that I still use. I bought The Complete Book of Greek Cooking by Rena Salaman and Jan Cutler on my return from Kefalonia, where there are two versions described. I use the first version, on page 96, although I note that the second one, on page 99, is very like Rick Stein’s version if you’ve ever tried producing that. The main difference is that the version that I use has egg yolks rather than whole eggs, as well as rice, whereas the other version uses whole eggs and has strips of chicken stirred into it rather than rice.
Here’s my preferred version of the two in the book, a perfect use for Churton Honesty Eggs (or any other eggs, of course 🙂 )
Serves 4
900ml home-made chicken stock, (in my case made by poaching a lot of chicken in water with parsley , onion and peppercorns)
50g white long-grain rice
3 egg yolks
30-60ml / 2-4 tablespoons of fresh lemon juice
30ml / 2 tablespoons chopped parsley
salt and black pepper
Lemons slices and parsley sprigs to garnish
Pour the stock into a pan and bring to simmering point, then add the drained rice. Half cover and cook for about 12 minutes until the rice is just tender. Season with salt and pepper.
Whisk the egg yolks in a bowl, then add about 30ml/tbsp of the lemon juice, whisking all the time until the mixture is smooth and bubbly. Add a ladleful of soup and whisk again
Remove the soup from the heat and slowly add the egg mixture, whisking all the time. The soup will turn a pretty lemon colour and will thicken slightly
Taste and add more lemon juice if necessary. Stir in the parsley. Serve at once, without reheating, garnished with lemon slices and parsley sprigs.
Top tip: The trick here is to add the egg mixture to the soup without it curdling. Avoid whisking the mixture into boiling liquid. It is safest to remove the soup from the heat entirely and then whisk in the mixture in a slow but steady stream.
The recipe advises against reheating to avoid curdling, but I prefer the soup hotter than it is at this point, so I heat it VERY slowly and carefully.
Don’t be tempted to skip the rice, even if it sounds a little odd, because it is really gorgeous, but must be cooked through. 12-15 minutes from when it enters the simmering water. Rick Stein uses orzo instead, but I really don’t recommend it. Far too solid and intrusive.
Churton Honesty Eggs
You can see my previous Churton egg adventures by clicking here. Churton Honesty eggs are parked in a barrow by the side of the road, and operate on an honesty system where you drop coins into the barrow in return for the eggs. You can hear the cockerel crowing, and he sounds like a fine fellow. The eggs are excellent.
Whenever I see Ann Davidson, who runs the free magazine My Village News, we discuss gardens and she nearly always brings me cuttings and little plants grown from seed, of which a yellow dahlia is a particular favourite. I haven’t seen her for a couple of months, but she remembered that I had said I would like to grow vines in the future, partly for the grapes but also for the vine leaves, which can be stuffed. Yesterday I heard the doorbell go when I was in the shower, and by the time I emerged, no-one was there of course, but there was a bag in my parcel box with lots of vine leaves and several bunches of tiny red grapes. The excitement!
Ann grows the vines herself in Bulkeley (probably best known as the home of The Bickerton Poacher, but perhaps that’s just me). The vine is a variety called Black Hamburg (Vitis vinifera Schiava Grossa) that Ann found at Wroxeter Roman Vineyard (which lies partly over the Roman site of Viroconium Cornoviorum). Wasting no time, I tried some of the grapes, which are tiny little explosions of massive flavour, utterly delectable, and I started looking at recipes for stuffed vine leaves (Greek dolmades).
I have had a love of Greek cooking for decades, due to the emphasis on quality ingredients and simple but big and well-matched flavours that taste, above all, fresh. Dolmades were a feature of rural cooking, usually vegetarian, quick, easy and inexpensive to prepare, but full of taste. In the vegetarian version the flavour comes from the onion, garlic, fresh herbs (including a selection from dill, mint, parsley, thyme, coriander, bay and oregano) and the stock in which the rice is cooked (which can be herb or vegetable stock). In a meat-based version, the flavour comes mainly from the meat and a less lavish combination of herbs, but may have more spices (such as cumin, paprika, fennel seed, nutmeg and cinnamon) and a vegetable-, herb- or meat-based stock. The meat used is usually minced lamb or goat. Coastal Greece and its islands have a shrubby, Mediterranean landscape that favours livestock that will browse on low quality vegetation.
Vine leaves are available in tins or vacuum-packed online and in some supermarkets, although I’ve never tried them. Those need no preparation. Ann’s, being fresh, needed to be softened a little, and the conventional wisdom of various recipes suggested that placing them in just-boiled water, taken off the heat, to poach for 5 minutes should do the trick, and it worked perfectly. The green of the leaf becomes a little yellower in the hot water, in spite of lemon juice being added, but this is normal.
I didn’t have any lamb or goat mince, and at this time of year there are not enough herbs in the garden for a fully flavoured vegetarian version, but I did have some beef mince, so went with that. I kept the spices and herbs simple: ground cumin, dried oregano, plus fresh marjoram and a bay leaf from the garden and a heaped teaspoon of sun-dried tomato paste.
Onion and garlic are fried with raw long-grained rice, and when the rice begins to go golden, the mince is added. Once the mince is browned, enough water is added to reach just below the top of the mince mix, and this is simmered off, so that a stodgy mix is left, and the rice has taken in some of the water to plump up a little. At this stage I stirred in some chilli flakes, some cassia bark (a bit like cinnamon) and some paprika, just to give it a bit more pizazz.
You will need an oven-proof dish with a lid. Place unused vine leaves on the base (the tatty ones or the ones that are too deeply lobed to hold the stuffing), and place tomato slices over the top. The vine leaves and tomato slices act as a lining and trivet to prevent the dolmades from burning and impart flavour into the water or stock that you pour over before putting it into the oven. I also added lemon slices to mine.
The rice mix is then added to the surface of the softened leaves. The leaf is laid out with the untidy side facing upwards so that when stuffed it is the smooth side that shows. Leave enough room for rice to continue expanding as it cooks. The vine leaf is like a sycamore leaf, an upside-down heart. I did mine by bringing together the two lobes of the heart across the mix, bringing in the two sides to cover it, and then pulling the pointed end over the top. Place seam-side down on the tomato layer, and when all the dolmades are in, preferably tightly fitting. I had a vine leaf left over, so aid it over the top, just for decorative effect.
Next add a good glug of olive oil and the juice of half a lemon, then place an oven-proof plate or equivalent on top to prevent them unravelling when you add the water. I used an all-metal pan lid. Then pour over hot water or stock. This should reach the top of the dolmades.
Some people do theirs on the hob, some in the oven. I did mine in a pre-heated oven at 190ºC (conventional oven). Recipes vary on how you should proceed from here but I simply let mine cook for 40 minutes, checking every 10 minutes to make sure that the dolmades didn’t dry out. There was still some liquid left at the end of the process, which will make an excellent stock, having incorporated not only the dolmades stuffing flavours, but the tomato and lemon from the base too.
Vegetarian dolmades are usually served slightly warm, at room temperature, or cold whereas meat ones are often served hot, but may also be warm or cold. I had mine straight out of the oven, but I cooked double what I needed to ensure that I would have half left over to try cold, and will be trying it tomorrow. The photo at the bottom of the page shows a tidy display, but that was before I drizzled the stock over the top of the dolmades, just to add some more flavour and interest. The tzatziki, recommended by every recipe I read, worked superbly.
Traditionally dolmades are served with lemon slices and tzatziki (mint in yogurt), and I served mine with both, as well as olives and a mixed herb salad with feta. It was not, however, a Greek salad, but a very English garden salad with mint, buckler-leaf sorrel, little gem, sweet cicely, marjoram and a lot of lovage, with some cucumber. I drizzled the whole lot with chilli oil and lemon juice, with lots of black pepper.
It was all a bit cobbled together but it was nevertheless a resounding success. I would like to do it with lamb and a different combination of accompanying herbs, and I must have a go at a vegetarian version, but the beef version was really excellent and will remain in my repertoire. Of course, I have now added a Black Hamburg vine to my must-have plant list! A visit to the Wroxeter Roman Vineyard might not be a bad idea either 🙂
The vine leaves before being drizzled with the Chilli oil and lemon juice.

 Although this is a great area to live, one of the things I still miss about living in London is a wide range of top-class take-away food restaurants on the doorstep. The whole process of ordering it online, dropping in and having a chat whilst waiting to collect it, carrying it tenderly home whilst inhaling the stunning aromas, and then pouring a big glass of wine to kick back and munch and slurp accompanied by a good movie was wonderful. My takeaways were always something to seriously, seriously enjoy.
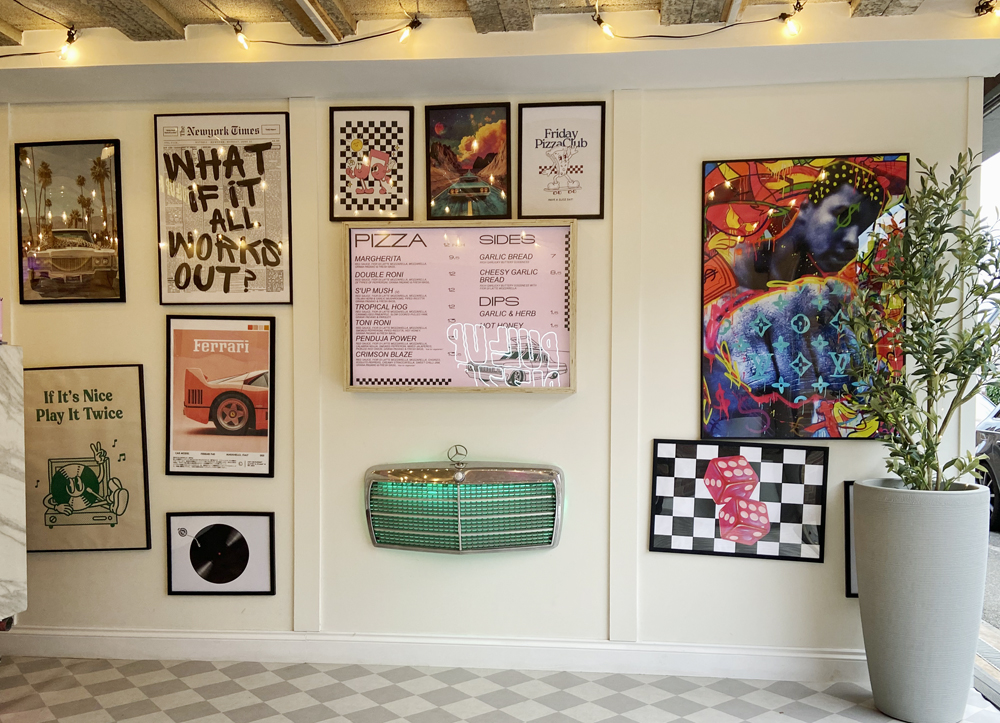 I first noticed it on Friday two weeks ago when I passed the garage entrance on my way home, a little way up from the post office/pharmacy in Farndon as you head north on Churton Road towards Chester. To my surprise the garage entrance was wide open, filled with light, and there was a busy pizza-making operation in full swing. I immediately abandoned my plans for making a fiddly cheese soufflé, ditched the car, and entered a nirvana of bright music, a chatty, friendly atmosphere and the most gorgeous aromas emanating in my direction. Fifteen minutes later I walked out with an exciting pink and black pizza box, the proud possessor of a Penduja Power. Oh the bliss! I could barely wait to get home to lift the lid as the aromas began to do serious injury to my will-power. The Penduja, with a crispy crust, thin base, chunky slices of jalapeño and thickly spread nduja, has a serious kick to it, with smokiness from the pepperoni, whilst both the creamy fior di latte mozzarella and pure mozzarella ensure that there is just the right balance of flavour, with subtle undertones and divine ultra-spicy overtones, all accompanied by gorgeous hits of fresh basil. It really was love at first glorious bite ❤️.
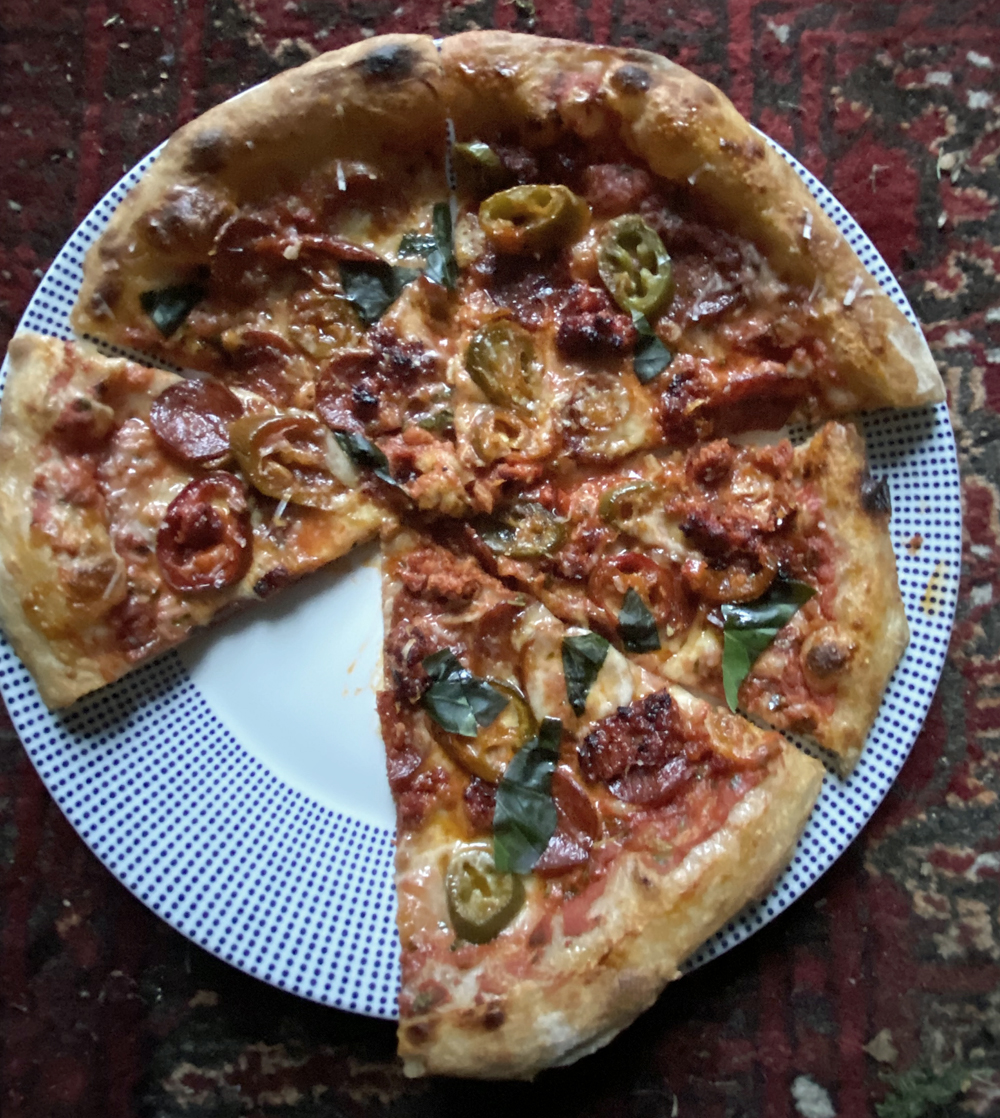
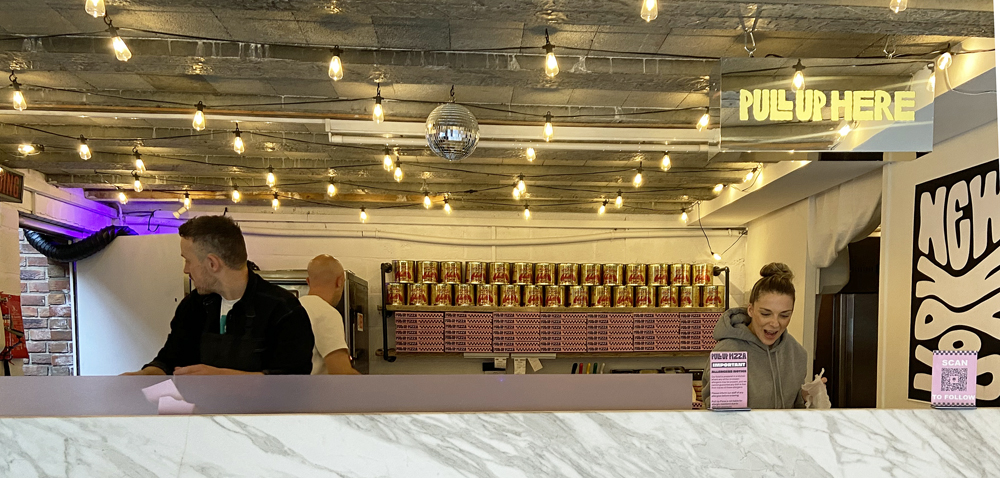 This is a real pop-up. When they close down, everything is on wheels so simply pushes back out of the way to re-create the garage space. It was really good to see people coming and going, chatting to the proprietors and generally enjoying the spectacle and the anticipation of great pizza and garlic bread (oh the scent of that garlic bread!). If you arrive early there is a bench inside where you can sit and wait. There is parking on the road immediately outside as well as on the main Farndon high street, and of course there is free parking at the Memorial Hall on Church Lane.


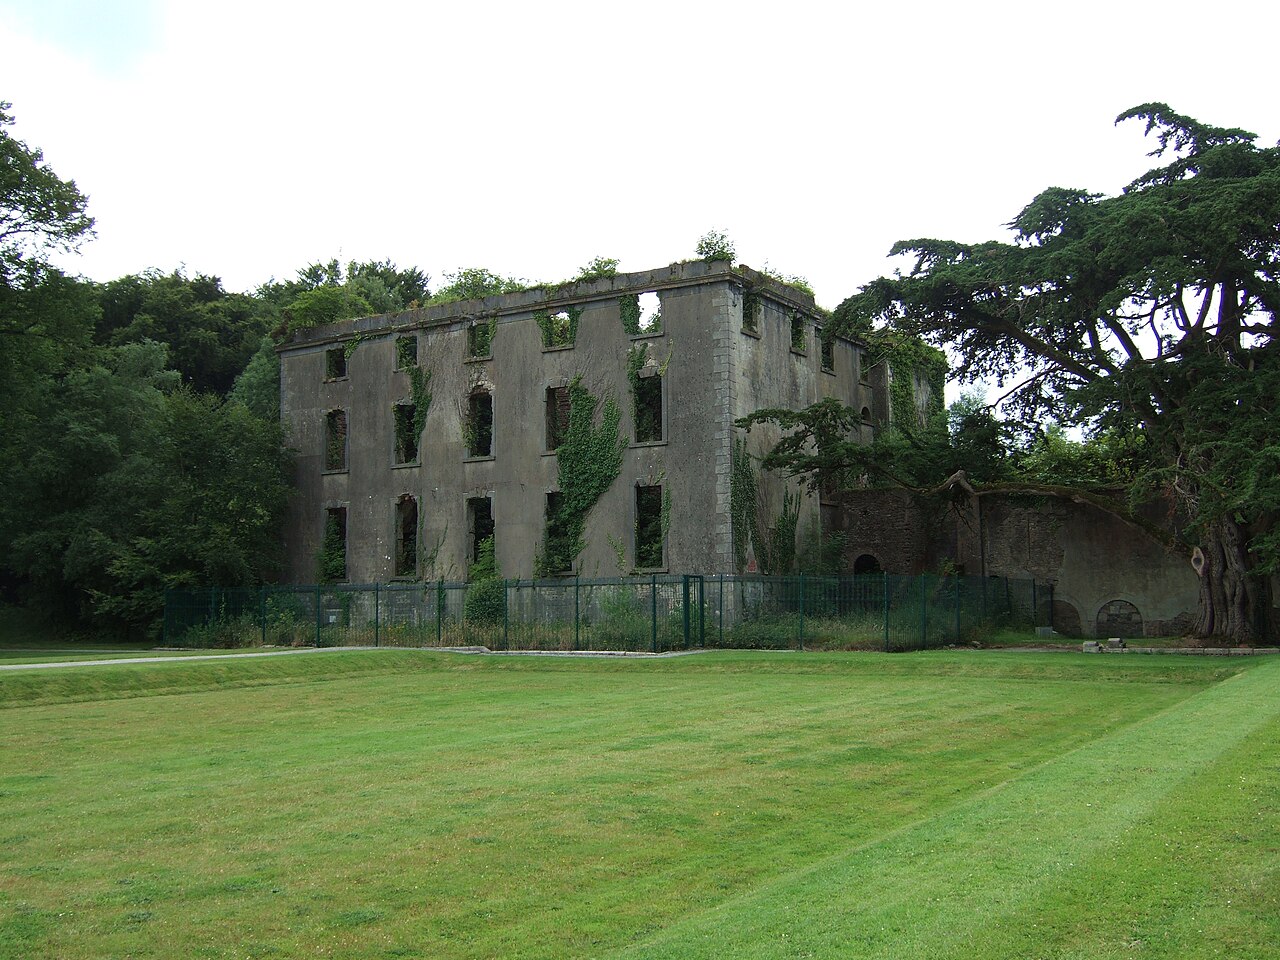


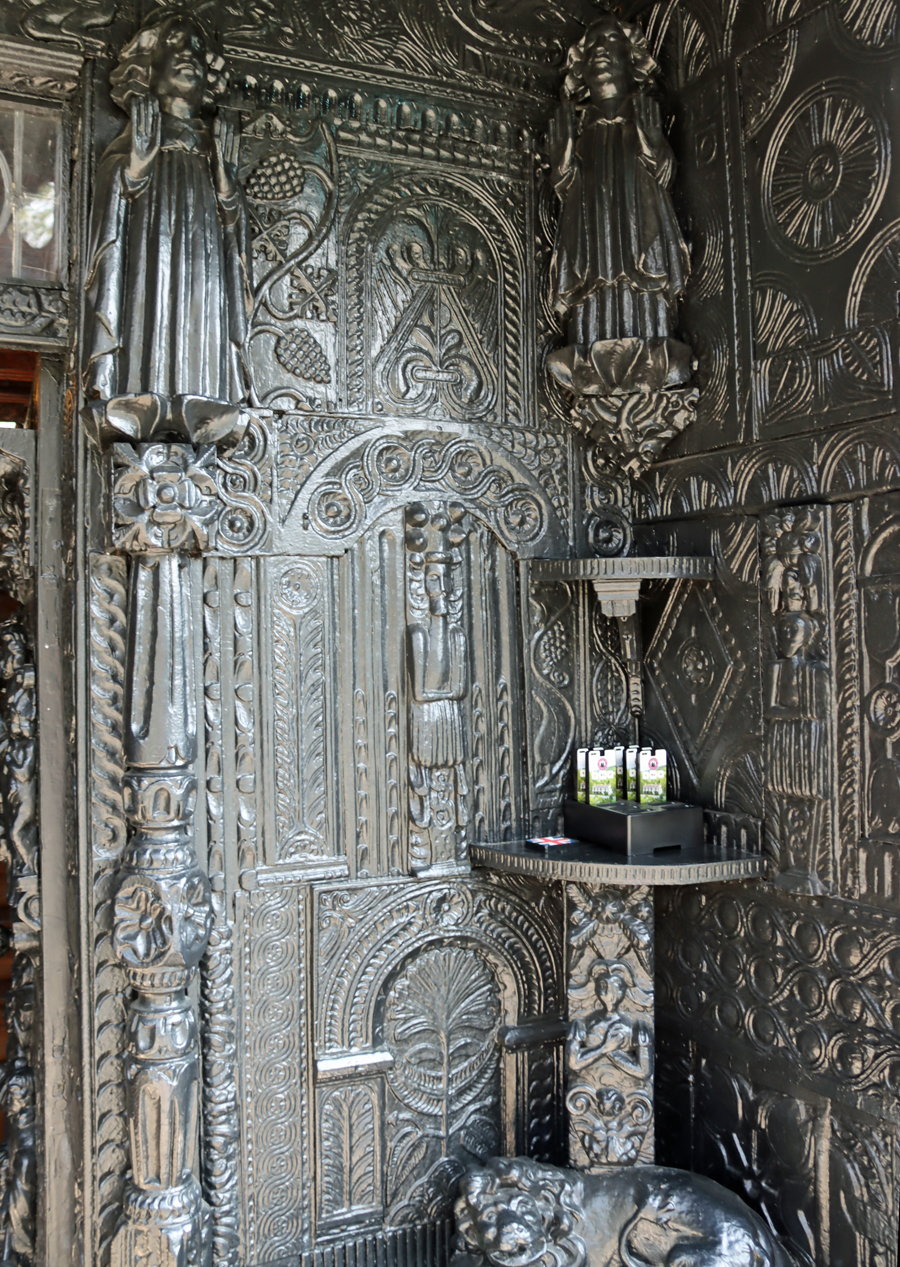
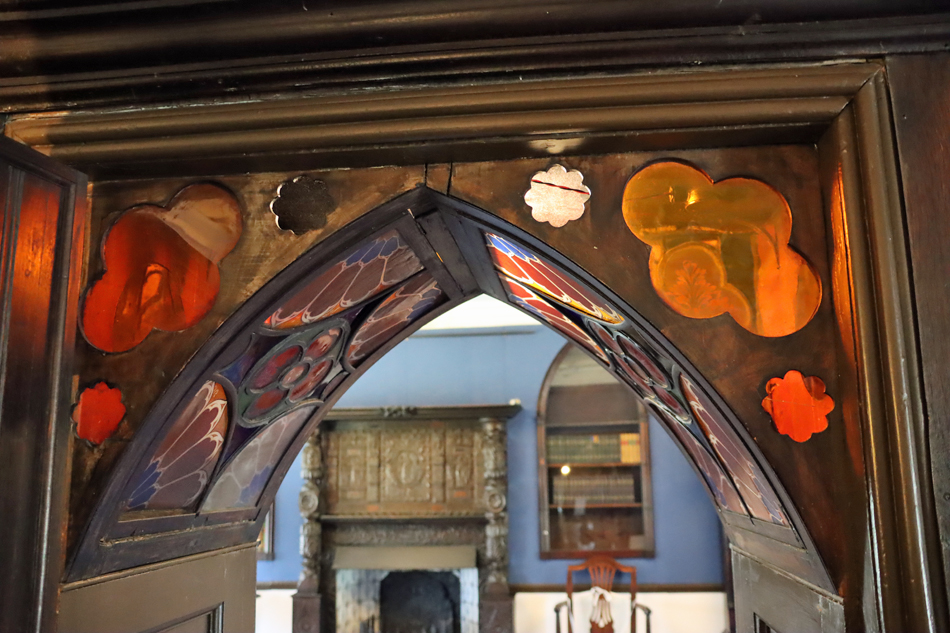


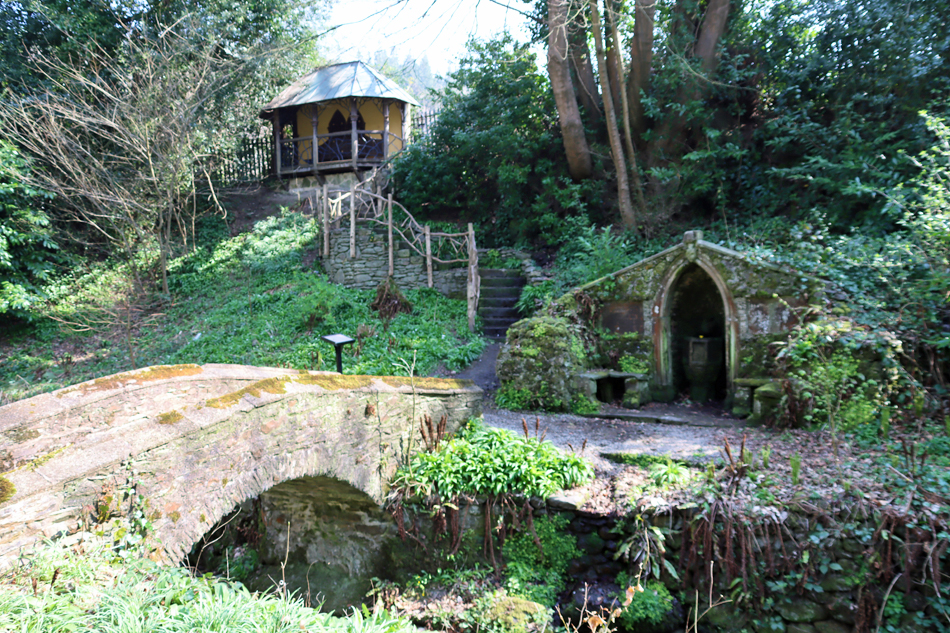


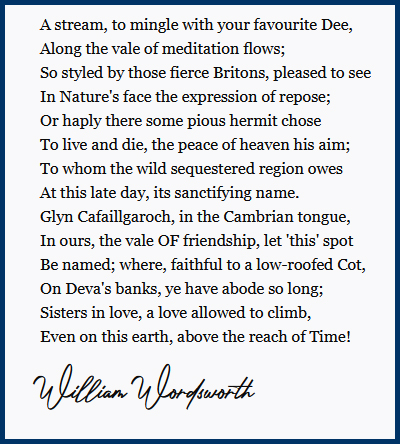
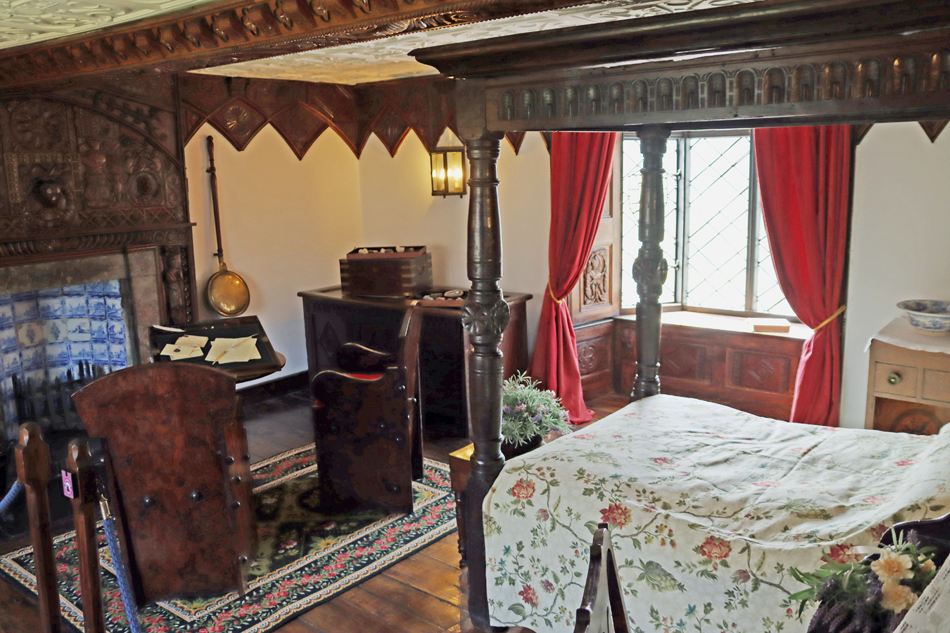


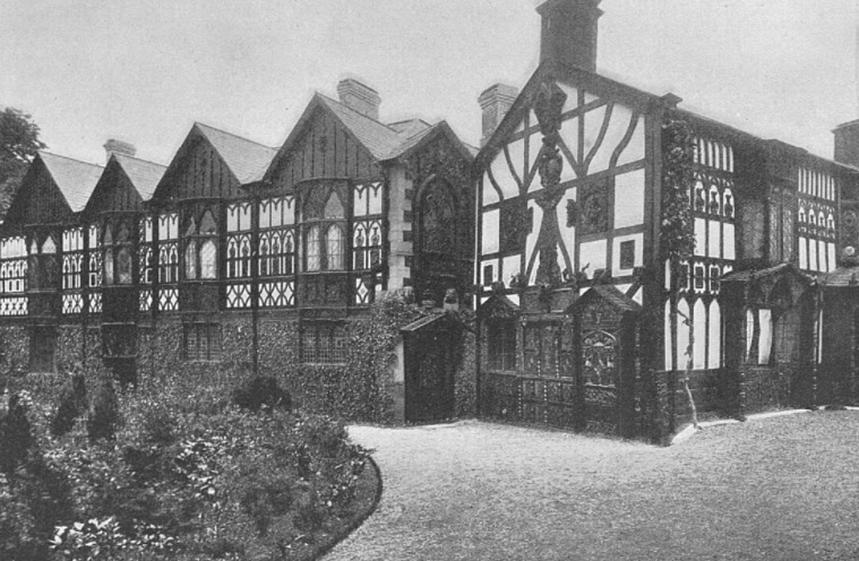


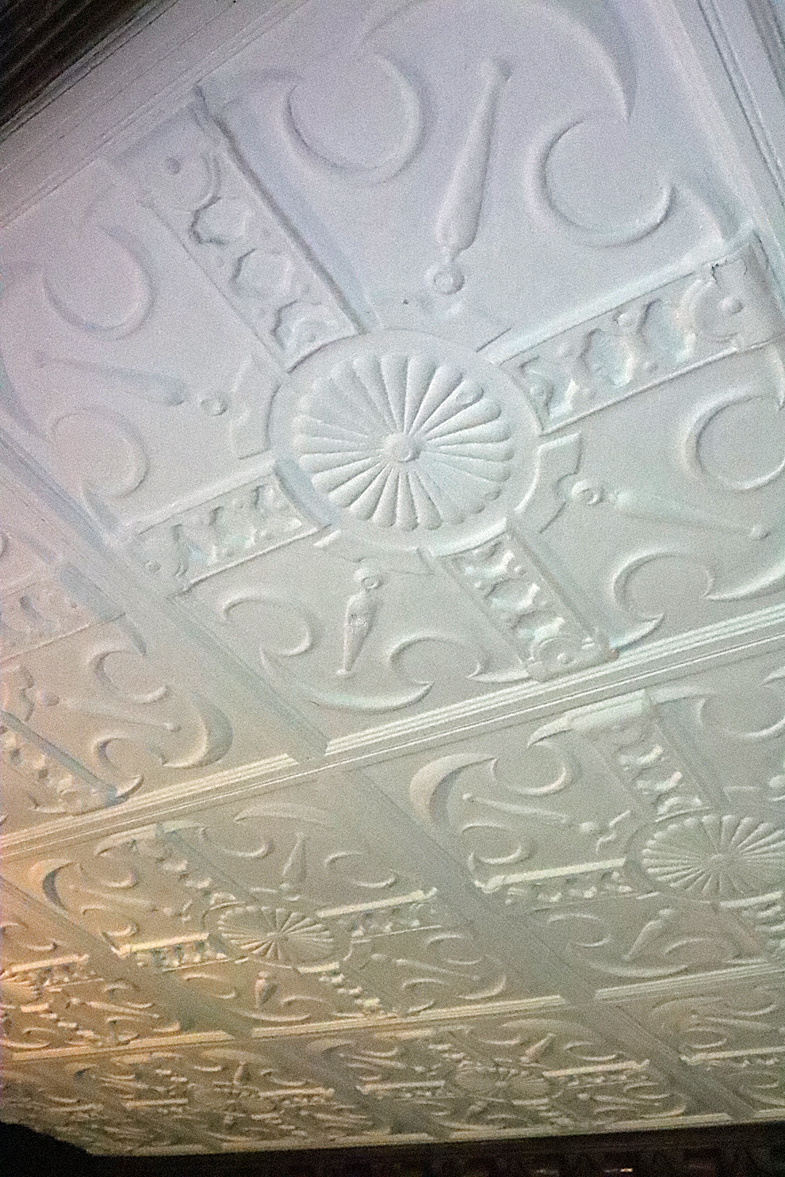


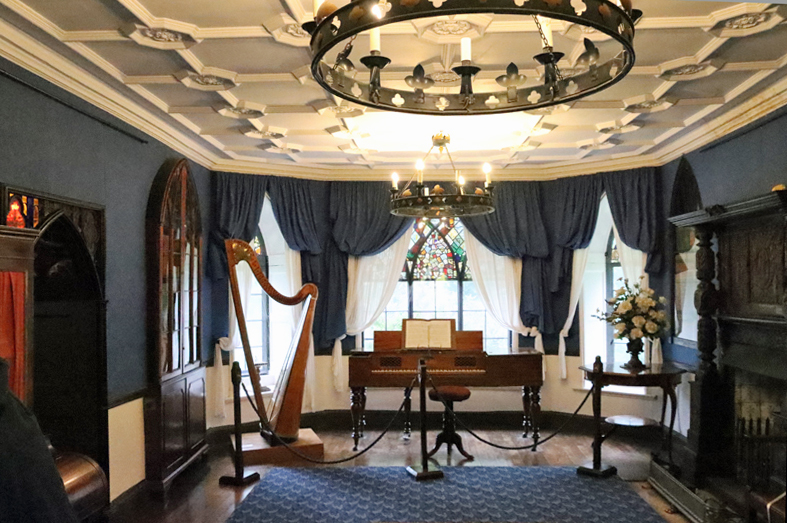


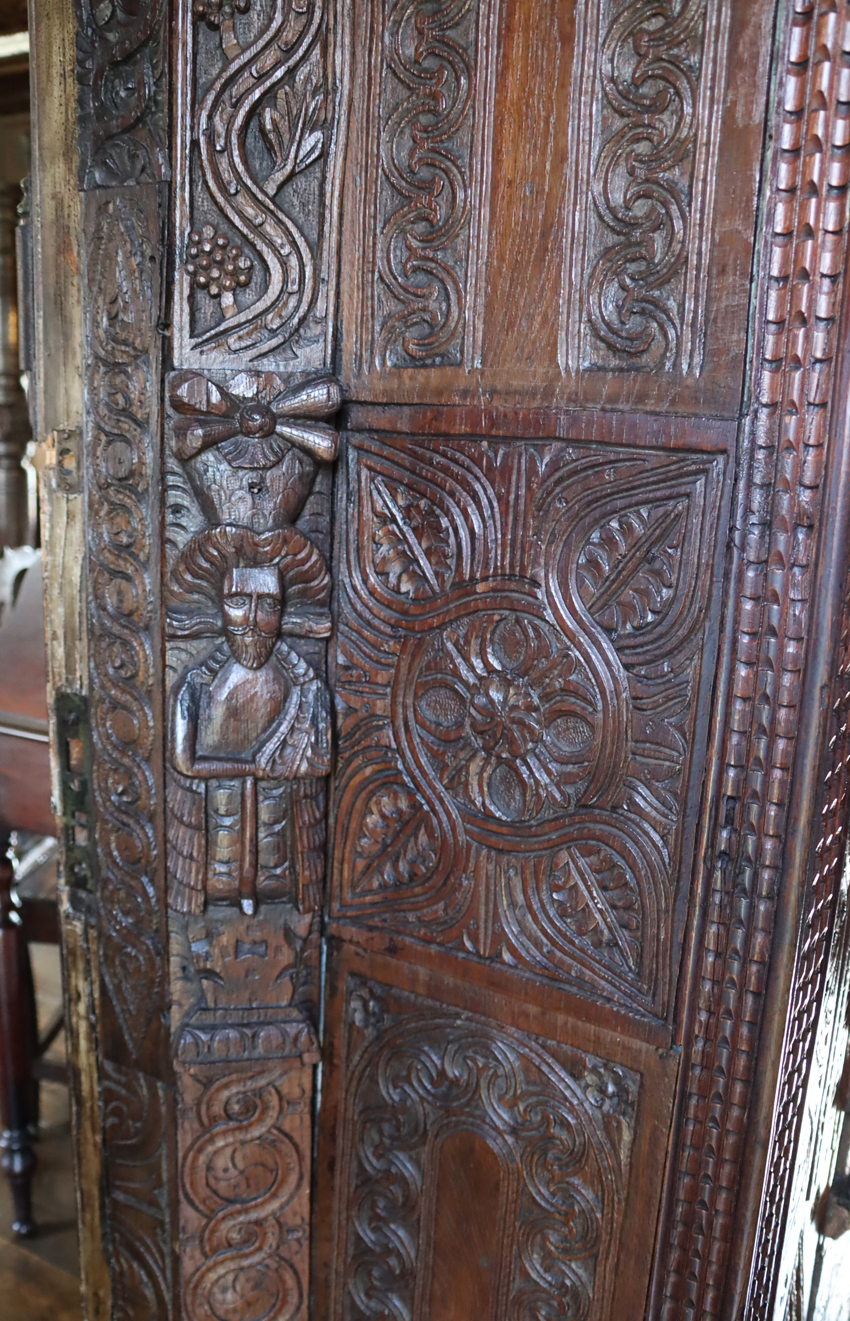
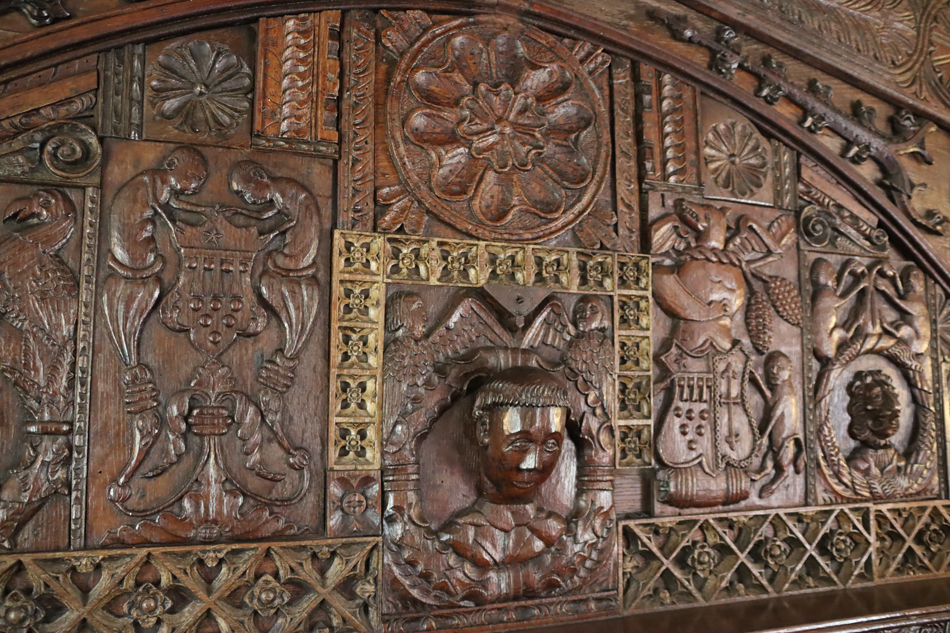


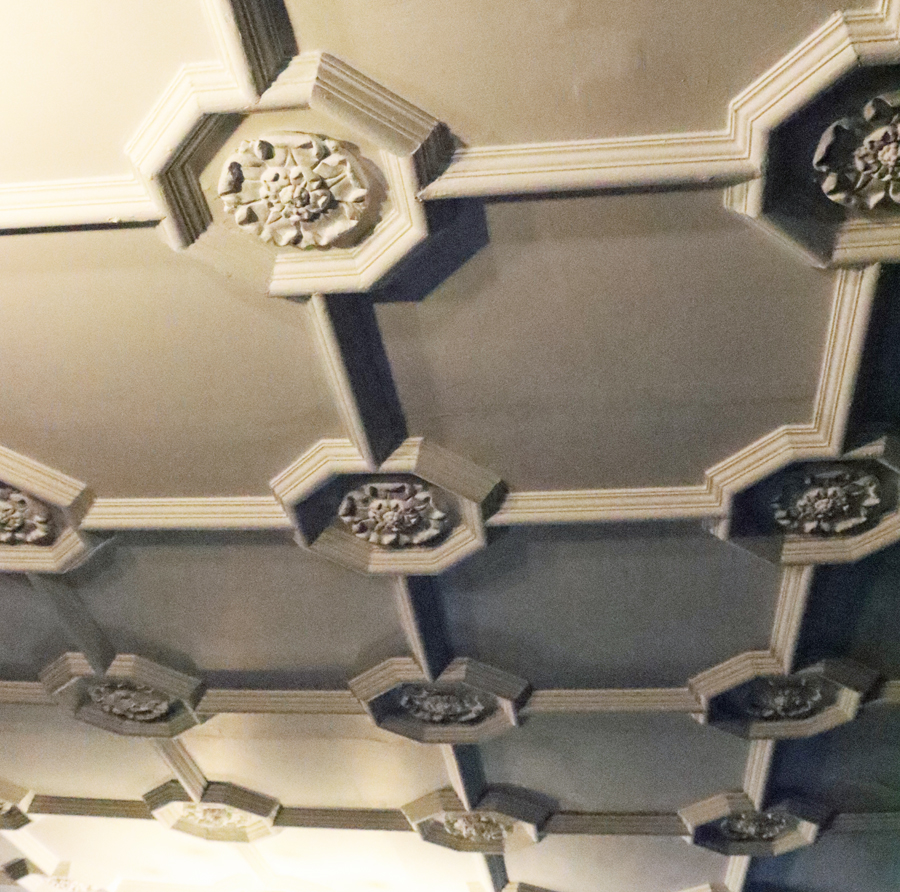

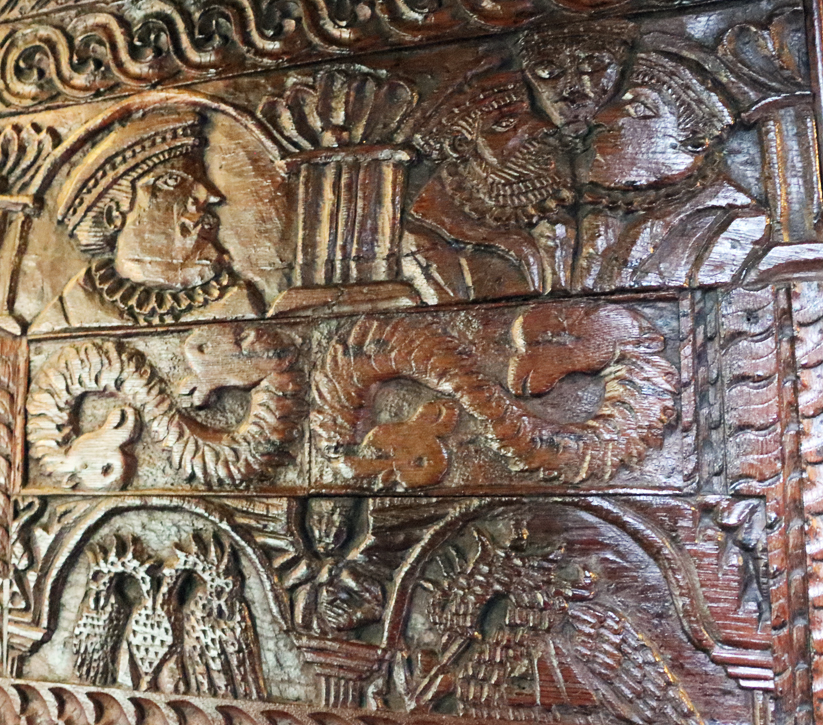

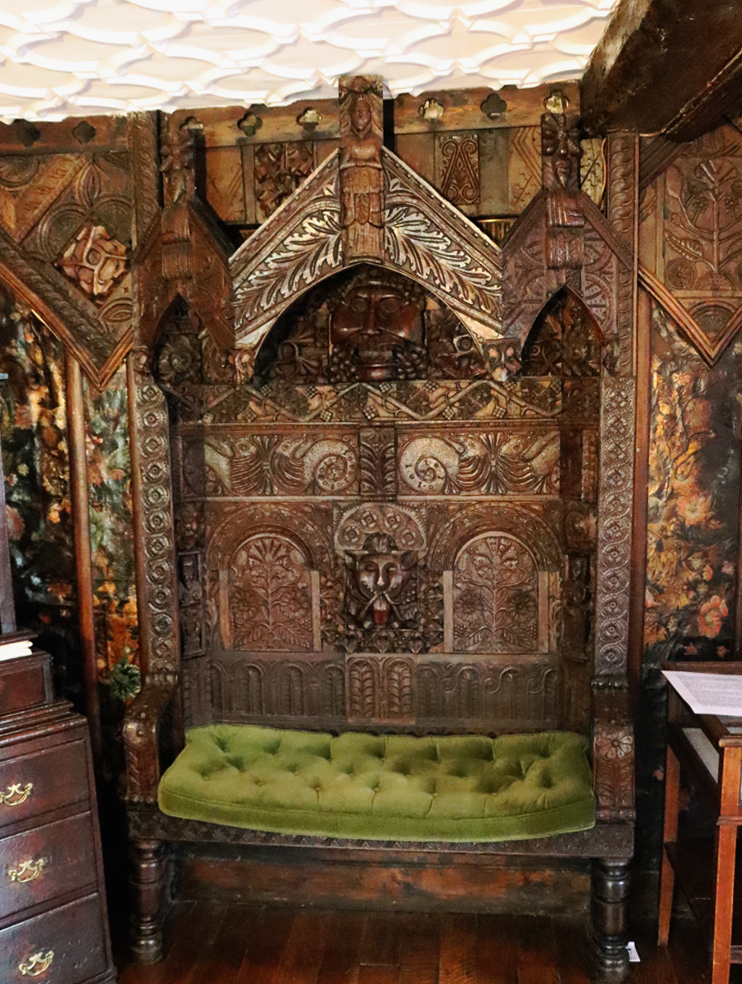


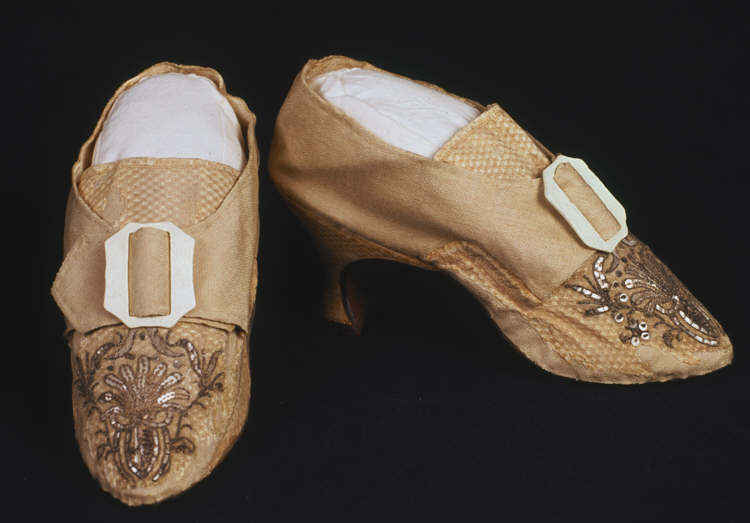

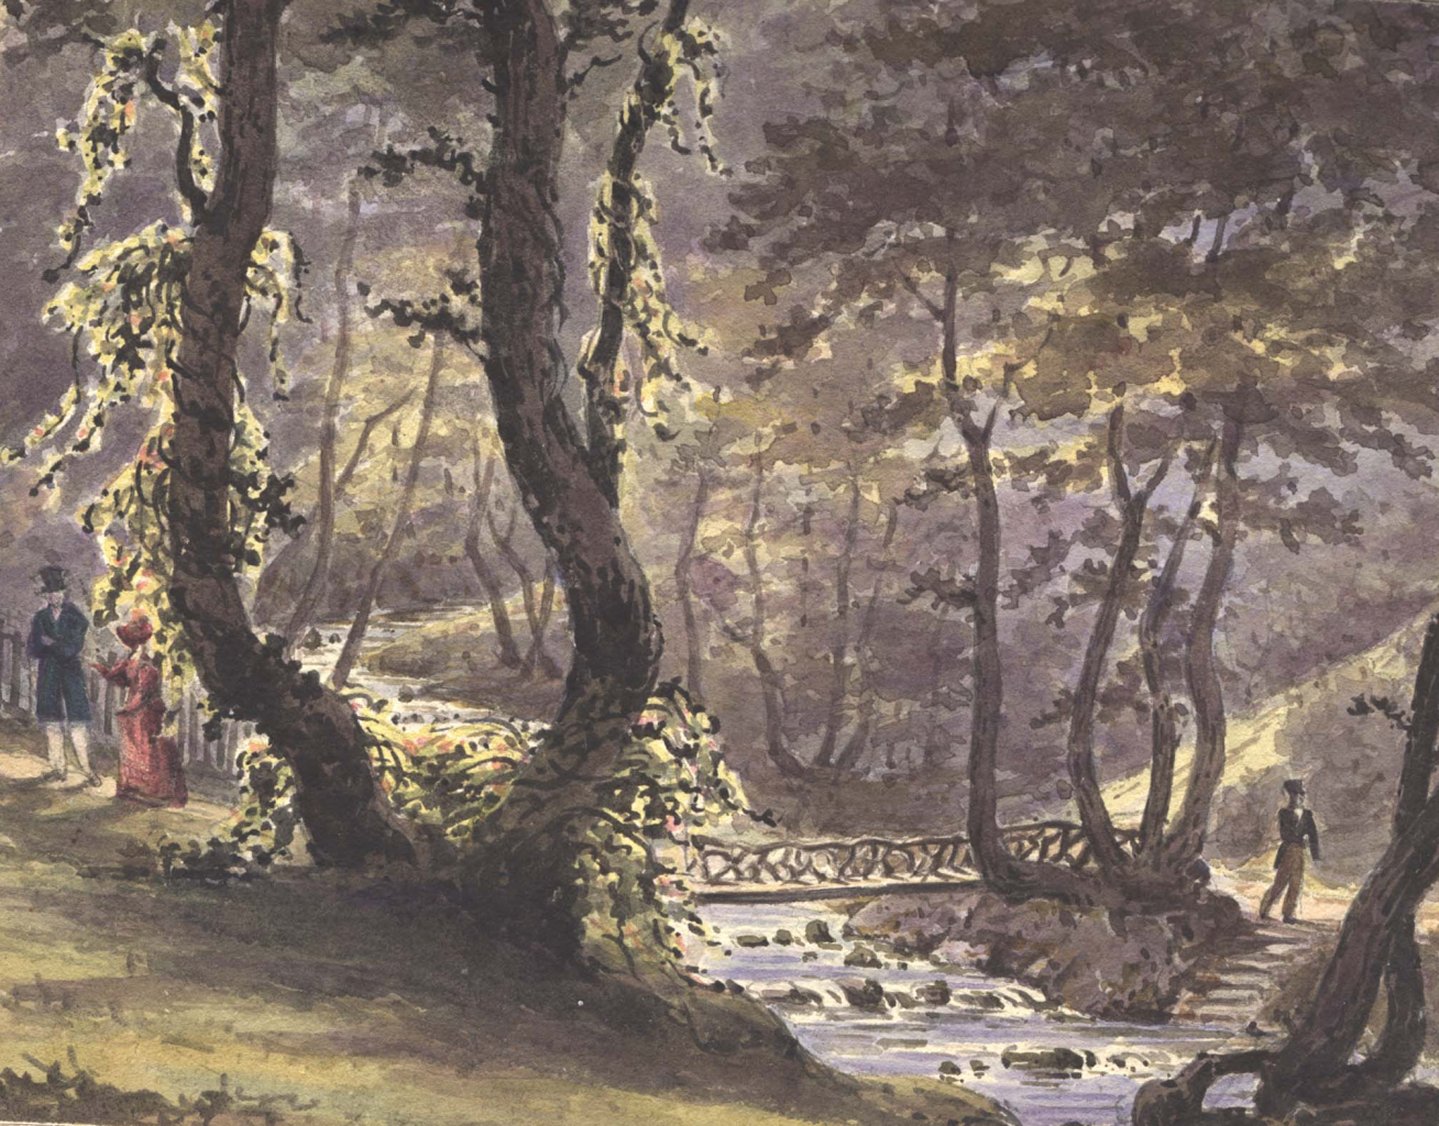


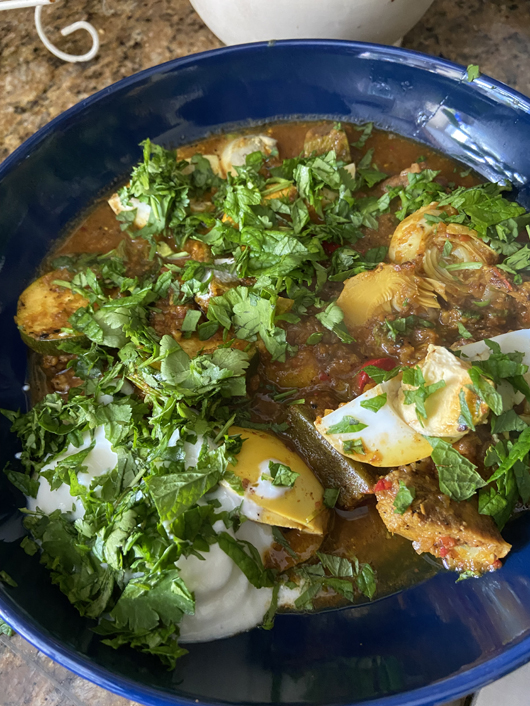


_(cropped).jpg)