

Egg bamya in preparation, ready to heat through
As today is National Egg Day in the United States, I hopped on the transatlantic bandwagon and decided to make myself an Egyptian egg bamya. I usually do a bamya in an electric slow-cooker with a piece of lamb shoulder or a lamb shank, but it is easy to turn it into a vegetarian dish for a change, by making eggs the star of the show and doing it on the hob. Eggs work brilliantly, and their texture is a great balance to the vegetables and sauce that accompany the dish. This is easy and quick to make and is delicious. Without the eggs, it becomes vegan. Depending on how much harissa and fresh chilli you add, this can be as hot or cool as you like.
To make the base, I used a tagine, which I use for just about everything on the hob, but if you use a skillet or tall-sided frying pan that has a lid, it works just as well. Heat some olive oil, add roughly chopped onion, fennel bulb and ginger, and when warmed through add fennel seeds, garlic, ras el hanout, saffron and harissa (I use the Bart brand), and fresh chilli if required (bearing in mind that there’s chilli in the harissa, and that there will be the option to add chopped chillis added later). When cooked through add tomatoes and vegetable stock and heat through, Then whizz the whole lot up in a blender or food processor. That’s the base sorted. Put it back in the pan and if you have time either leave it for a few hours, or overnight to develop the flavours. When ready to proceed, turn your attention to the vegetables.

Egg bamya, lid off, steam escaping, and nearly ready to serve
For the veg, today I heated up some olive oil and lightly browned courgette cut into discs and okra (bamya is an Arabic word for okra), but aubergines also work well too (with more oil). When lightly browned, but not fully cooked, add them to the pan that is holding the base sauce. A couple of handfuls of spinach or, when in season, ramsons (wild garlic) are splendid stirred in to the base at this stage too. Then, over the top, add preserved lemon slices, sliced fresh red chilli, halved artichoke hearts (beautiful small ones are available from M&S and great Cypressa brand ones in some Co-op branches, both of them in oil in jars; and brined ones in tins are available in all big supermarkets). When in season, apricot halves work well too, Push them down into the sauce.
If you are using a shallow dish, with everything spread out, gently push down the halved or quartered hard-boiled eggs into all the deliciousness, and the job is done. If you are using a deeper saucepan, leave the eggs out for now.
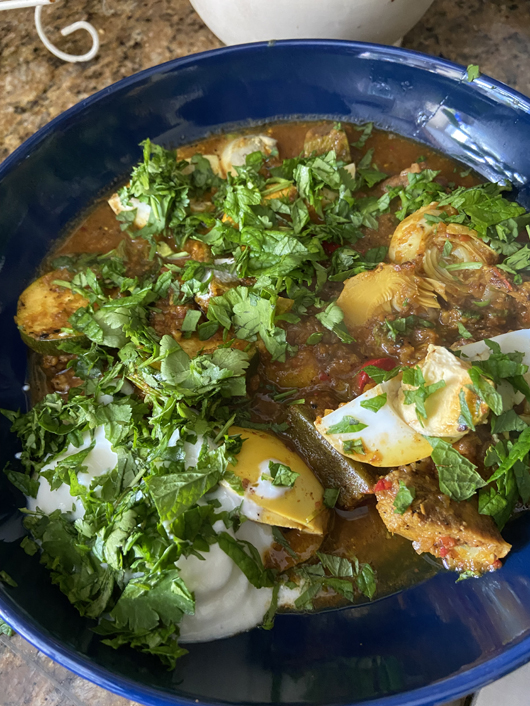
A rather inelegant bowl of the final version – comfort food rather than Michelin star appearance, more ladled in than plated up, and topped with a serious amount of divine coriander and mint from the garden. I could have lavished more attention on the appearance but I was famished, and it tasted super.
If you are using a shallow dish, with everything spread out with the eggs sitting in the top, it all heats through, starting from room temperature, under a lid on a low flame for around 35 minutes. The captured steam, recycling under the lid, helps to heat from the top as well as the bottom, meaning that you can preserve the look of the thing and prevent the egg yolk dividing from the egg white if you want to plonk it on the middle of a dining table for the visual impact.
If you are using a deeper saucepan, cook the ingredients on a medium flame for around 20 minutes, drop the temperature to low, and add the eggs for another 7 minutes or so just to heat them through.
A couple of minutes before serving I gently fold in a big handful of fresh coriander, another of oregano or marjoram and a smaller handful of mint, careful not to disturb the eggs. This adds fresh flavour and gently softens the herbs.
To serve, I add a good sprinkling of coriander (see below for alternatives) and lime juice over the top.
To serve on the side, either plain Greek yogurt or tzatziki (Greek yogurt, chopped mint and diced coriander, with a quick squeeze of lime) is superb and balances whatever heat you’ve added with the harissa and chillis. Whipped feta cheese with mint and olive oil is also a great alternative. I find that this dish needs salt. Rice (very good with saffron in the water) or cous cous are obvious additions if you want a filling side dish, and salad works well too.

Lovage growing in a pot on my patio
If you hate coriander, here are three possible alternatives other than flat-leaf parsley. It’s a bit esoteric, but you can buy potted lovage in garden centres, It has an aromatic, slightly citrusy edge that needs to be used cautiously because it is strong, but often works as a good substitute for coriander for those who hate it, although it tastes quite different. Alternatively, and again it has to come from a garden centre, the finely-chopped stems and feathery foliage of fennel are mild but noticeable and work really well as an alternative. Marjoram and oregano are both aromatic Mediterranean herbs that grow brilliantly in pots, and also work well when chopped over the top of this. Both lovage and fennel bought in small pots and planted out into bigger pots with compost grow like crazy, last all summer and are superb. They vanish underground for winter, but reappear in spring, and lovage in particular turns out to be remarkably hardy. Marjoram is more tender and may not survive the winter, but oregano tends to be quite resilient.


